nodejs高级
https://www.bilibili.com/video/BV1sA41137qw?p=2
Natives modules
- 当前层内容由JS实现
- 提供应用程序可以直接调用库,例如fs,path,http等
- JS语言无法直接操作底层硬件设备
Builtin modules 胶水层
底层:
- V8: 执行js代码,提供桥梁接口
- Libuv:时间循环,事件队列,异步io
- 第三方模块:zlib,http,c-cares等

- Reactor 模式,单线程完成多线程工作
- Reactor模式下实现异步io,事件驱动
- Nodejs更适用于io密集型高并发请求
轮询技术
- read
- select
- poll linux下的
- kqueue
- event ports
libuv库


异步io总结
- io是应用程序的瓶颈所在
- 异步io提高性能无采原地等待结果返回
- io操作属于操作系统级别,平台都有对应实现
- Nodejs单线程配合事件驱动架构及libuv实现了异步io
事件驱动架构是软件开发中的通用模式
- 事件驱动
- 发布订阅
- 观察者
require('events')
const EventEmitter = require('events')
const myEvent = new EventEmitter()
//订阅事件
myEvent.on('事件1',()=>{
    console.log('事件1执行了');
})
myEvent.on('事件1',()=>{
    console.log('事件1-1执行了');
})
//触发事件  按照注册的事件执行
myEvent.emit('事件1');

// 事件1执行了
// 事件1-1执行了
nodejs主线程是单线程
- 通过异步非阻塞io配合事件回调通知
class集群多线程问题
const http = require('http')

function sleepTime(time){
    const sleep = Date.now()+time * 1000
    while(Date.now()<sleep){}
    return
}
sleepTime(4)//耗时
const server = http.createServer((req,res)=>{
    res.send('server starting ....');
})

server.listen(8080,()=>{
    console.log('启动');
})
Node.js应用场景
- io密集型高并发请求
- 操作数据库提供API服务
- 实时聊天程序
- Nodejs更适合io密集型任务

api服务
- npm init -y
- tsc --init //初始化tsconfig.json
- npm i ts-node -D
- npm i express
- npm i @types/express -D //ts识别 express
api_server.ts

import express from 'express'

const app = express();
app.get('/',(req,res)=>{
    res.end('xxx');
})
app.listen(8080,()=>{
    console.log('启动');
})

//tsconfig.json
//允许导入json
//resolveJsonModule": true,
Nodejs中全局对象
- 与浏览器平台的window不完全相同
- Nodejs全局对象上挂在许多属性
Global的根本作用就是作为宿主
全局对象可以看作是全局变量的宿主
Nodejs中全局对象是global
Nodejs常见全局变量
- __filename: 返回正在执行脚本文件的绝对路径
- __dirname:返回正在执行脚本所在目录
- timer类函数: 执行顺序与事件循环间的关系
- process:提供与当前进程互动的接口
- require:实现模块的加载
- module,exports:处理模块的导出
console.log(global)
<ref *1> Object [global] {
  global: [Circular *1],
  clearInterval: [Function: clearInterval],
  clearTimeout: [Function: clearTimeout],
  setInterval: [Function: setInterval],
  setTimeout: [Function: setTimeout] {
    [Symbol(nodejs.util.promisify.custom)]: [Getter]
  },
  queueMicrotask: [Function: queueMicrotask],
  performance: [Getter/Setter],
  clearImmediate: [Function: clearImmediate],
  setImmediate: [Function: setImmediate] {
    [Symbol(nodejs.util.promisify.custom)]: [Getter]
  }
}

console.log(__filename)
console.log(__dirname)
//默认情况下this是空对象 和global 并不是一样的

console.log(this==global)  //false


//在调用文件的时候 会传 require('module')  __filename  __dirname  module exports
(function(){
    console.log(this==global);  true
})()
全局变量之 process
无须require可直接使用
- 获取进程信息
- 执行进程操作
//资源: cpu内存
console.log(process.memoryUsage())
{
  rss: 166219776,  //常驻内存
  heapTotal: 135598080,//申请的总的内存大小
  heapUsed: 105314928,//实际使用的内存大小
  external: 3629670,  //扩展内存(底层c c++所使用的内存大小)
  arrayBuffers: 2148609// 高版本以前也是放在 external中,代表一个独立空间大小缓存区大小
}

//资源  cpu  内存
Buffer.alloc(1000)
console.log(process.memoryUsage())
{
  rss: 166424576,
  heapTotal: 135335936,
  heapUsed: 105663496,
  external: 3674675,
  arrayBuffers: 2193614
}

console.log(process.cpuUsage())
{
    user: 3234000, //  用户占用的cpu时间片段
    system: 265000 //系统占用的cpu时间片段
}

//运行环境 : 运行目录,node环境, cpu架构,用户环境,系统平台
console.log(process.cwd());//当前项目的所在路径 工作目录运行路径
console.log(process.version); //node版本
console.log(process.versions);//node v8 zlib  brotli 等的版本
console.log(process.arch);// cpu架构  x64
console.log(process.env.NODE_ENV);// undefined  环境设置获取(生产环境 开发环境等)
console.log(process.env.PATH);//配置的系统环境变量
console.log(process.env.USERPROFILE);//管理员目录 例如:C:\Users\Administrator   如果是mac就是HOME
console.log(process.platform);//系统平台 win32

//运行状态:启动参数,pid 运行时间
console.log(process.argv)//node .main.js 1 2 3
[
  'D:\\study\\service\\api\\node_modules\\ts-node\\dist\\bin.js',
  'D:\\study\\service\\api\\main.test.ts',
  '1',
  '2'
]
console.log(process.argv0);//   node
console.log(process.pid);// 16940
console.log(process.execArgv);//未看到效果
console.log(process.ppid);


//运行时间
console.log(process.uptime());//0.030201 从运行的开始到运行的结束
setTimeout(()={
    console.log(process.uptime())
},3000)
process事件:
//事件 当前脚本完成之后触发
process.on('exit',(code)=>{
    console.log('exit'+code);
    setTimeout(()=>{//exit只能写同步代码 这里面的不会执行
        console.log(123);
    })
})
process.on('beforeExit',(code)=>{
    console.log('before exit' + code);
})
console.log('代码执行完成')
代码执行完成
before exit0
exit0

process.exit();//如果写了上面的事件是不会触发  程序走到这里直接退出

//标准输出输入错误
console.log = function(data){
    //process.stdout 是一个流
    process.stdout.write('---'+data+'\n')//标准输出
}
const fs = require('fs');
//创建一个可读流,,,将数据通过管道交给下一个参数(环节)
fs.createReadStream('test.txt').pipe(process.stdout)

//process.stdin 输入流
process.stdin.pipe(process.stdout);//将流给 process.stdout


process.stdin.setEncoding('utf-8');//设置流字符集
process.stdin.on('readable',()=>{//内置事件
    let chunk = process.stdin.read();//标准输入里读取数据
    if(chunk != null){
        process.stdout.write('data'+chunk)
    }
})
path 模块常用api
- 内置模块,require之后直接使用
- 用于处理文件/目录的路径
- basename() 获取路径中基础名称
- dirname() 获取路径中目录名称
- extname() 获取路径中扩展名称
- isAbsolute() 获取路径是否为绝对路径
- join() 凭借多个路径片段
- resolve() 返回绝对路径
- parse() 解析路径
- format()序列化路径
- normalize() 规划化路径
const path = require('path')
console.log(__filename);
//获取路径中的基础名称
console.log(path.basename(__filename));//main.js
console.log(path.basename(__filename,'.js'));//main

//获取路径中的基础名称
console.log(path.basename(__filename,'.css')) //main.js
console.log(path.basename('a/b/c'));/c
console.log(path.basename('a/b/c/'));/c

1.返回的就是接收路径当中的最后一部分
2.第二个参数表示扩展名,如果说没有设置则返回完整的文件名带后缀
3.第二个参数作为后缀时,如果没有在当前路径中被配置到,那么会忽略
4.处理目录路径的时候如果说,结尾处有路径分隔符,则也会被忽略掉


console.log(path.extname(__filename));  // .js
console.log(path.extname('/a/b')); //啥也没有
console.log(path.extname('/a/b/index.html.js.css')); // .css
console.log(path.extname('/a/b/index.html.js.'));//.


console.log(path.parse('/a/b/c/index.html'));
{
  root: '/',
  dir: '/a/b/c',
  base: 'index.html',
  ext: '.html',
  name: 'index'
}


console.log(path.parse('/a/b/c'));
{ root: '/', dir: '/a/b', base: 'c', ext: '', name: 'c' }


console.log(path.parse('./a/b/c/'));
{ root: '', dir: './a/b', base: 'c', ext: '', name: 'c' }


console.log(path.format(path.parse('./a/b/c/'))); //./a/b\c
绝对路径
判断当前路径是否是绝对路径


console.log(path.isAbsolute('foo')); //false
console.log(path.isAbsolute('/foo'));//true
console.log(path.isAbsolute('///foo'));//true
console.log(path.isAbsolute(''));//false
console.log(path.isAbsolute('.'));//false
console.log(path.isAbsolute('../bar'));//false
路径拼接
console.log(path.join('a/b','c','index.html'));//a\b\c\index.html
console.log(path.join('/a/b','c','index.html'));//\a\b\c\index.html
console.log(path.join('/a/b','c','../','index.html'));//\a\b\index.html
console.log(path.join('/a/b','c','./','index.html'));//\a\b\c\index.html
console.log(path.join('/a/b','c','','index.html'));//\a\b\c\index.html
规范化路径
console.log(path.normalize(''))//.
console.log(path.normalize('a/b/c/d'))// a\b\c\d
console.log(path.normalize('a///b/c../d'))// a\b\c..\d
console.log(path.normalize('a//\\/b/c\\/d'))// a\b\c\d
console.log(path.normalize('a//\/b/c\/d')) // a\b\c\d
绝对路径
console.log(path.resolve('index.html'))//D:\study\service\api\index.html
Buffer 缓冲区
- Buffer 让javascript 可以操作二进制
- io行为操作的就是二进制数据
- Stream流操作并非nodejs独创
- 流操作配合管道实现数据分段传输
- buffer 由c++ 分配 v8回收
Buffer总结
- 无需require的一个全局变量
- 实现Nodejs平台下的进制数据操作
- 不占用v8堆内存大小的内存空间
- 内存的使用由node来控制,由v8的GC回收
- 一般配合Stream流使用,充当数据缓冲区

创建Buffer实例
Nodejs中的Buffer是一片内存空间
- alloc:创建指定字节大小的buffer
- allocUnsafe:创建指定大小的buffer(不安全)
- from: 接收数据,创建buffer
//16 进制  每一个都是8位
const b1 = Buffer.alloc(10)
console.log(b1);//<Buffer 00 00 00 00 00 00 00 00 00 00>


const b2 = Buffer.allocUnsafe(10)
console.log(b2);//<Buffer 00 00 00 00 00 00 00 00 00 00>
不安全得只要有空间就会拉来使用
Buffer.from("1") 创建buffer
Buffer.from(string|array|Buffer, 字符集) 参数
能接收字符串 数组 本身buffer
const b1 = Buffer.from('中')
console.log(b1);//<Buffer e4 b8 ad>//三个字节

//数组中有中文直接放不识别中文
const b1 = Buffer.from([1,2,'中'],'utf8')
console.log(b1);//<Buffer 01 02 00>


const b1 = Buffer.from([0xe4, 0xb8, 0xad], 'utf8')
console.log(b1);//<Buffer e4 b8 ad>
console.log(b1.toString()); //中


const b1 = Buffer.alloc(3);
const b2 = Buffer.from(b1);//创建一个对应空间的空数据
console.log(b1);//<Buffer 00 00 00>
console.log(b2);//<Buffer 00 00 00>
b1[0] = 1
console.log(b1);//<Buffer 01 00 00>
console.log(b2);//<Buffer 00 00 00>
总结: 对新空间的一个拷贝
新空间的拷贝
Buffer实例方法
- fill:使用数据填充buffer
- write:向buffer中写入数据
- toString:从buffer中提取数据
- slice:截取buffer
- indexOf:在buffer中查找数据
- copy:拷贝buffer中的数据
fill
let buf = Buffer.alloc(6)

buf.fill('123456');
//内存长度大于填充长度会重复填充
//内存长度小于填充长度会截取
//buf.fill(string,index,last)
//string 填充的数据
//index 对应buffer下标位置
//last:写入的结束位置结束位置取不到
//如果string可以是int类型 但是buffer中始终是16进制的
console.log(buf)//<Buffer 31 32 33 34 35 36>
console.log(buf.toString())//123456
write
let buf = Buffer.alloc(6);
buf.write('123',1);
//buf.write(string,start,length)
// 没有填充效果,start是开始填充位置,length当前要写入的一个长度
console.log(buf);
console.log(buf.toString())
toString
buf = Buffer.from('按不出');
console.log(bur);
console.log(bur.toString());


const buf = Buffer.from('按不出');
console.log(buf );
console.log(buf .toString('utf-8'));// 正常输出
console.log(buf .toString('utf-8',3));// 正常输出  一个字符三个字节(哪一个位置开始截取)

console.log(buf .toString('utf-8',3,9));// 截取 从3  -9
slice
const buf = Buffer.from('按不出');
let b1= buf.slice()
console.log(b1)
console.log(b1.toString())

const buf = Buffer.from('按不出');
let b1= buf.slice(3)//截取开始位置
//slice(start,end);  slice(-3) 从后往前截取
console.log(b1)
console.log(b1.toString())
indexOf
const buf = Buffer.from('fff犯得上反对')
console.log(buf)
console.log(buf.indexOf('上'))  //9
console.log(buf.indexOf('上',10))  //从第10个开始找,没找到就是-1
copy
const buf = Buffer.alloc(6)
let b2 = Buffer.from('abc')
b2.copy(b1)//b2 为copy源 b1为copy容器

b2.copy(b1,3,3)
// copy(b1,index ,start,end)
//index从哪个位置开始写入
//start 从哪个位置开始读取
//end 哪个位置结束
Buffer静态方法
- concat 将多个buffer拼接成一个新的buffer
- isBuffer 判断当前数据是否为buffer
let b1 = Buffer.from('顶顶')
let b2 = Buffer.from('撒啊')
let b = Buffer.concat([b1,b2])
console.log(b)
console.log(b.toString())// 顶顶撒啊
let b = Buffer.concat([b1,b2],9)// 三个字节  顶顶撒


let b1 = '123'
let b2 = Buffer.alloc(3)
console.log(Buffer.isBuffer(b1));//false
console.log(Buffer.isBuffer(b2));//true
自定义Buffer的split
ArrayBuffer.prototype.split = function(sep){
    let len = Buffer.from(sep).length//分隔的字符长度
    let ret = []
    let start = 0
    let offset = 0
    while(offset = this.indexOf(sep,start)!=-1){
        ret.push(this.slice(start,offset))
        start = offset + len
    }
    ret.push(this.slice(start))
    return ret
}
let buf = 'zce吃馒头,吃面条,我吃所有吃'
let bufArr = buf.split('吃')
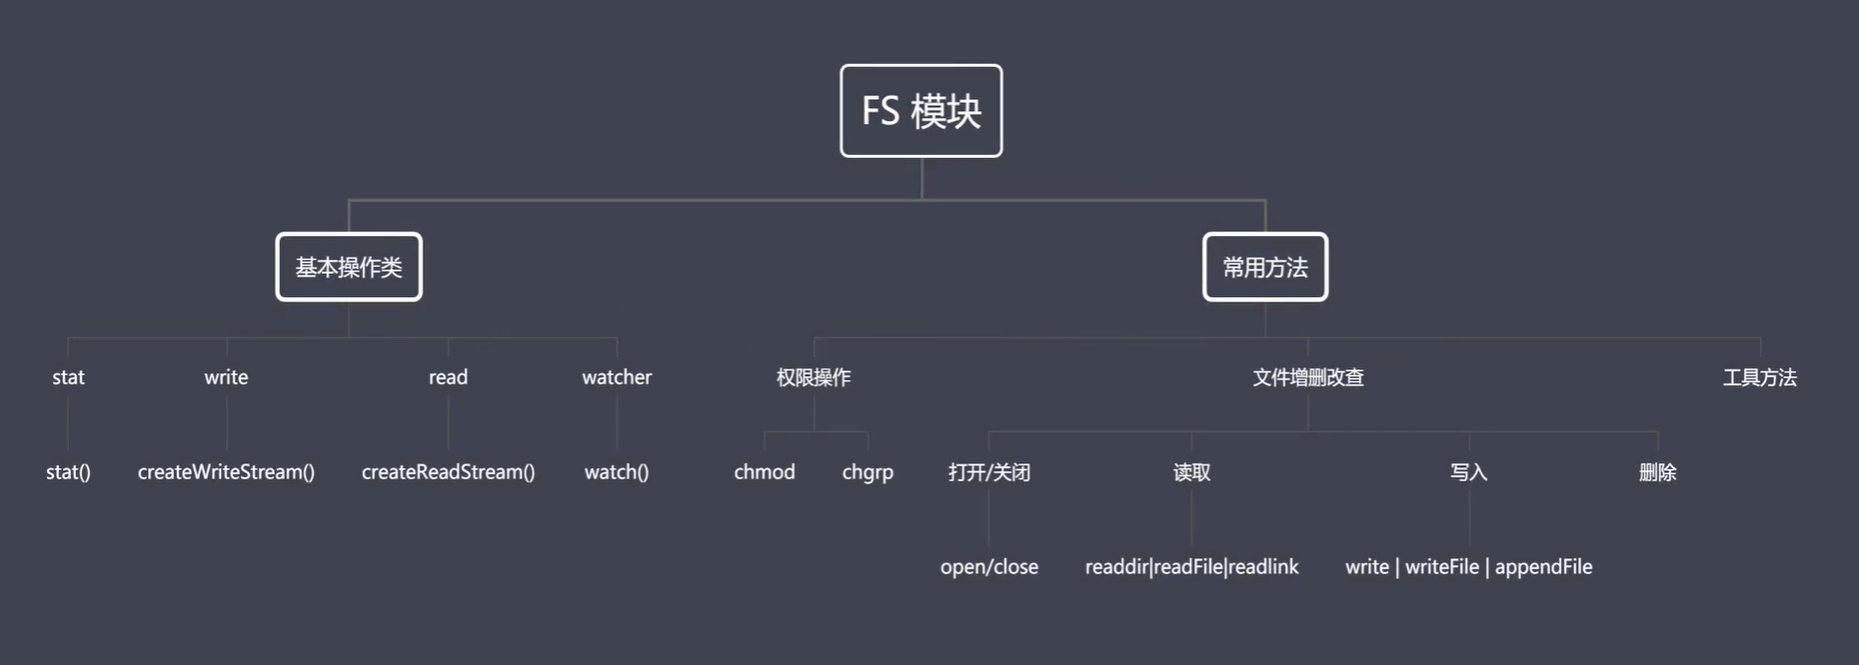
fs模块
readFile 是一次性将文件读取或写入


常见flag操作符
- r表示可读
- w表示可写
- s表示同步
- +表示执行相反操作
- x表示排它操作
- a表示追加操作
fs介绍总结
- fs是Nodejs中内置核心模块
- 代码层面上fs分为基本操作类和常用API
- 权限位 标识符 操作符
文件操作api
- readFile 从指定文件中读取数据
- writeFile 向指定文件中写入数据
- appendFile 追加的方式向指定文件中写入数据
- copyFile 将某个文件中的数据拷贝至另一个文件
- watchFile 指定文件进行监控
readFile
const fs = require('fs');
const path = require('path')

//readFile
fs.readFile(path.resolve('data.txt'),'utf-8',(err,data)=>{
    console.log(err);
    console.log(data);
})
writeFile
//writeFile 覆盖的写操作
fs.writeFile('data.txt','hello node.js',(err)=>{
//如果文件不存在 创建文件
    if(!err){
        fs.readFile('data.txt','utf-8',(err,data)=>{
            console.log(data)//hello node.js
        })
    }
})
- 默认覆盖写
- 写入的时候文件不存在会创建这个文件
writeFile
//writeFile
fs.writeFile('data.txt','123',{
    mode:438,//操作权限  可读可写 不可执行
    flag:'r+',//可读可写 直接覆盖前几个,,,如果是w+则是全文件覆盖写入
    encoding:'utf-8'
},(err)=>{
    if(!err){
        fs.readFile('data.txt','utf-8',(err,data)=>{
            console.log(data); //123lo node.js
        })
    }

})
- r+ 读取后写入
- w+清空后写入
appendFile
//appendFile
fs.appendFile('data.txt','he',(err)=>{
    console.log('写入成功')
})
第三个参数也可以传对象{}
//copyFile
fs.copyFile('data.txt','test.txt',()=>{
    console.log('拷贝成功')
})
//watchFile
//interval 间隔 毫秒
fs.watchFile('data.txt',{interval:20},(curr,prev)=>{
    if(curr.mtime != prev.mtime){//mtime 修改时间
        console.log('文件被修改了')
        fs.unwatchFile('data.txt')//取消监控
    }
})
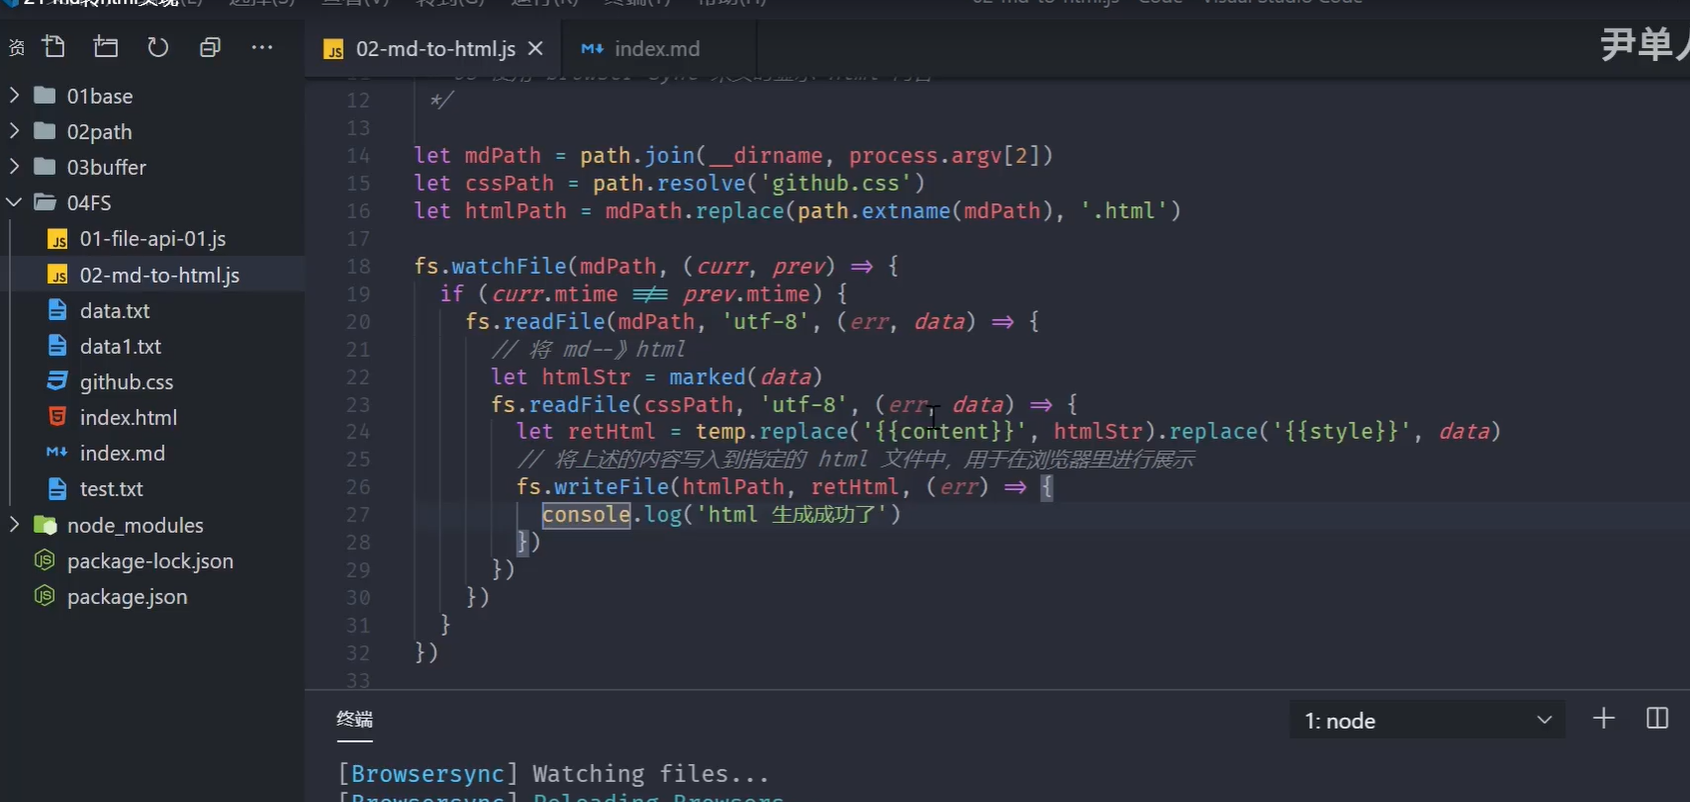
markdown转html -todo
const fs = require('fs')
const path = require('match')
const marked = require('marked')
const browserSync = require('browser-sync')
1.读取md和css内容
2.将上述读取出来的内容替换占位符,生成一个最终需要展示的html字符串
3.将上述的html字符写入到指定的html文件中
4.监听md文件内容的变化,然后更新html内容
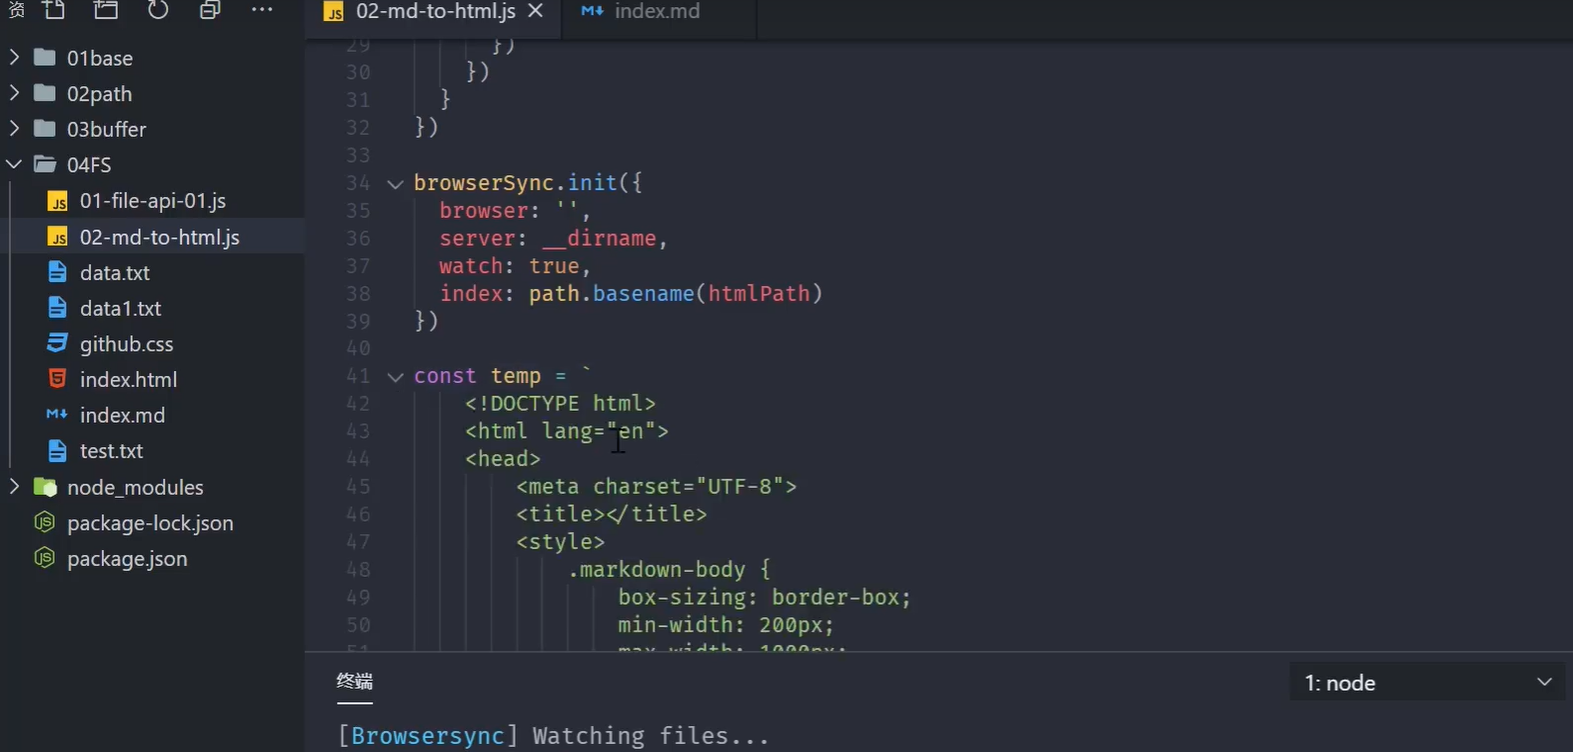
5.使用browser-sync 来实现显示Html内容
let mdPath = path.join(__dirname,process.argv[2])
let cssPath = path.resolve('github.css')
let htmlPath = mdPath.replace(path.extname(mdPath),'.html')
console.log(mdPath)
console.log(cssPath)
console.log(htmlPath)
fs.readFile(mdPath , 'utf-8',(err,data)=>{
    //将 md -》html
    let htmlStr = marked(data)
    fs.readFile(cssPath,'utf-8',(err,data)=>{
        let retHtml = temp.replace('{{content}}',htmlStr).replace('{{style}}',data)
        //将上述的内容写入到指定的html文件中,用于在浏览器里展示
        fs.writeFile(htmlPath,retHtml,(err)=>{
            console.log('html 生成成功')
        })
    })
})