js:对象;原型链;继承;访问器;
基础知识
对象是包括属性与方法的数据类型,JS 中大部分类型都是对象如 String/Number/Math/RegExp/Date 等等。
传统的函数编程会有错中复杂的依赖很容易创造意大利式面条代码。
面向过程编程
let name = "大军";
let grade = [
  { lesson: "js", score: 99 },
  { lesson: "mysql", score: 85 },
];
function average(grade, name) {
  const total = grade.reduce((t, a) => t + a.score, 0);
  return name + ":" + total / grade.length + "分";
}
console.log(average(grade, name));
面向对象编程
下面使用对象编程的代码结构清晰,也减少了函数的参数传递,也不用担心函数名的覆盖
let user = {
  name: "后盾人",
  grade: [
    { lesson: "js", score: 99 },
    { lesson: "mysql", score: 85 },
  ],
  average() {
    const total = this.grade.reduce((t, a) => t + a.score, 0);
    return this.name + ":" + total / grade.length + "分";
  },
};
console.log(user.average());
#OOP
- 对象是属性和方法的集合即封装
- 将复杂功能隐藏在内部,只开放给外部少量方法,更改对象内部的复杂逻辑不会对外部调用造成影响即抽象
- 继承是通过代码复用减少冗余代码
- 根据不同形态的对象产生不同结果即多态
#基本声明
使用字面量形式声明对象是最简单的方式
let obj = {
  name: "后盾人",
  get: function () {
    return this.name;
  },
};
console.log(obj.get()); //后盾人
属性与方法简写
let name = "后盾人";
let obj = {
  name,
  get() {
    return this.name;
  },
};
console.log(obj.get()); //后盾人
其实字面量形式在系统内部也是使用构造函数 new Object创建的,后面会详细介绍构造函数。
let hd = {};
let houdunren = new Object();
console.log(hd, houdunren);
console.log(hd.constructor);
console.log(houdunren.constructor);
#操作属性
使用点语法获取
let user = {
  name: "大军",
};
console.log(user.name);
使用[] 获取
console.log(user["name"]);
可以看出使用.操作属性更简洁,[]主要用于通过变量定义属性的场景
let user = {
  name: "大军",
};
let property = "name";
console.log(user[property]);
如果属性名不是合法变量名就必须使用扩号的形式了
let user = {};
user["my-age"] = 28;
console.log(user["my-age"]);
对象和方法的属性可以动态的添加或删除。
const hd = {
  name: "人",
};
hd.age = "10";
hd.show = function () {
  return `${this.name}已经${this.age}岁了`;
};
console.log(hd.show());
console.log(hd);

delete hd.show;
delete hd.age;

console.log(hd);
console.log(hd.age); //undefined
#对象方法
定义在对象中的函数我们称为方法,下面定义了学生对象,并提供了计算平均成绩的方法
let lisi = {
  name: "李四",
  age: 22,
  grade: {
    math: 99,
    english: 67,
  },
  //平均成绩
  avgGrade: function () {
    let total = 0;
    for (const key in this.grade) {
      total += this.grade[key];
    }
    return total / this.propertyCount("grade");
  },
  //获取属性数量
  propertyCount: function (property) {
    let count = 0;
    for (const key in this[property]) count++;
    return count;
  },
};
console.log(lisi.avgGrade());
一个学生需要手动创建一个对象,这显然不实际的,下面的构造函数就可以解决这个问题
#引用特性
对象和函数、数组一样是引用类型,即复制只会复制引用地址。
let hd = { name: "后盾人" };
let cms = hd;
cms.name = "hdcms";
console.log(hd.name); //hdcms
对象做为函数参数使用时也不会产生完全赋值,内外共用一个对象
let user = { age: 22 };
function hd(user) {
  user.age += 10;
}
hd(user);
console.log(user.age); //32
对多的比较是对内存地址的比较所以使用 == 或 === 一样
let hd = {};
let xj = hd;
let cms = {};
console.log(hd == xj); //true
console.log(hd === xj); //true
console.log(hd === cms); //false
#this
this 指当前对象的引用,始终建议在代码内部使用this 而不要使用对象名,不同对象的 this 只指向当前对象。
下例是不使用 this 时发生的错误场景
- 删除了
xj变量,但在函数体内还在使用xj变量造成错误 - 使用
this后始终指向到引用地址,就不会有这个问题
let xj = {
  name: "大军",
  show() {
    return xj.name;
  },
};
let hd = xj;
xj = null;
console.log(hd.show()); //Error
改用this 后一切正常
let xj = {
  name: "大军",
  show() {
    return this.name;
  },
};
let hd = xj;
xj = null;
console.log(hd.show()); //Error
#展开语法
使用...可以展示对象的结构,下面是实现对象合并的示例
let hd = { name: "后盾人", web: "houdurnen.com" };
let info = { ...hd, site: "hdcms" };
console.log(info);
下面是函数参数合并的示例
function upload(params) {
  let config = {
    type: "*.jpeg,*.png",
    size: 10000,
  };
  params = { ...config, ...params };
  console.log(params);
}
upload({ size: 999 });
#对象转换
#基础知识
对象直接参与计算时,系统会根据计算的场景在 string/number/default 间转换。
- 如果声明需要字符串类型,调用顺序为
toString > valueOf - 如果场景需要数值类型,调用顺序为
valueOf > toString - 声明不确定时使用
default,大部分对象的default会当数值使用
下面的数值对象会在数学运算时转换为 number
let houdunren = new Number(1);
console.log(houdunren + 3); //4
如果参与字符串运算时会转换为 string
let houdunren = new Number(1);
console.log(houdunren + "3"); //13
下面当不确定转换声明时使用 default ,大部分default转换使用 number 转换。
let houdunren = new Number(1);
console.log(houdunren == "1"); //true
#Symbol.toPrimitive
内部自定义Symbol.toPrimitive方法用来处理所有的转换场景
let hd = {
  num: 1,
  [Symbol.toPrimitive]: function () {
    return this.num;
  },
};
console.log(hd + 3); //4
#valueOf/toString
可以自定义valueOf 与 toString 方法用来转换,转换并不限制返回类型。
let hd = {
  name: "人",
  num: 1,
  valueOf: function () {
    console.log("valueOf");
    return this.num;
  },
  toString: function () {
    console.log("toString");
    return this.name;
  },
};
console.log(hd + 3); //valueOf 4
console.log(`${hd}大军`); //toString 后盾人大军
#解构赋值
解构是一种更简洁的赋值特性,可以理解为分解一个数据的结构,在数组章节已经介绍过。
- 建设使用
var/let/const声明
#基本使用
下面是基本使用语法
//对象使用
let info = { name: "人", url: "houdunren.com" };
let { name: n, url: u } = info;
console.log(n); // 人

//如果属性名与变量相同可以省略属性定义
let { name, url } = { name: "人", url: "houdunren.com" };
console.log(name); // 人
函数返回值直接解构到变量
function hd() {
  return {
    name: "人",
    url: "houdunren.com",
  };
}
let { name: n, url: u } = hd();
console.log(n);
函数传参
"use strict";
function hd({ name, age }) {
  console.log(name, age); //大军 18
}
hd({ name: "大军", age: 18 });
系统函数解构练习,这没有什么意义只是加深解构印象
const { random } = Math;
console.log(random());
#严格模式
非严格模式可以不使用声明指令,严格模式下必须使用声明。所以建议使用 let 等声明。
// "use strict";
({ name, url } = { name: "人", url: "houdunren.com" });
console.log(name, url);
还是建议使用let等赋值声明
"use strict";
let { name, url } = { name: "人", url: "houdunren.com" };
console.log(name, url);
#简洁定义
如果属性名与赋值的变量名相同可以更简洁
let web = { name: "人", url: "houdunren.com" };
let { name, url } = web;
console.log(name); //人
只赋值部分变量
let [, url] = ["人", "houdunren.com"];
console.log(url); //houdunren.com

let { name } = { name: "人", url: "houdunren.com" };
console.log(name); //人
可以直接使用变量赋值对象属性
let name = "人",
  url = "houdunren.com";
//标准写法如下
let hd = { name: name, url: url };
console.log(hd); //{name: "人", url: "houdunren.com"}

//如果属性和值变量同名可以写成以下简写形式
let opt = { name, url };
console.log(opt); //{name: "人", url: "houdunren.com"}
#嵌套解构
可以操作多层复杂数据结构
const hd = {
  name: "人",
  lessons: {
    title: "JS",
  },
};
const {
  name,
  lessons: { title },
} = hd;
console.log(name, title); //人 JS
#默认值
为变量设置默认值
let [name, site = "hdcms"] = ["人"];
console.log(site); //hdcms

let { name, url, user = "大叔" } = { name: "人", url: "houdunren.com" };
console.log(name, user); //大叔
使用默认值特性可以方便的对参数预设
function createElement(options) {
  let { width = "200px", height = "100px", backgroundColor = "red" } = options;

  const h2 = document.createElement("h2");
  h2.style.width = width;
  h2.style.height = height;
  h2.style.backgroundColor = backgroundColor;
  document.body.appendChild(h2);
}
createElement({
  backgroundColor: "green",
});
#函数参数
数组参数的使用
function hd([a, b]) {
  console.log(a, b);
}
hd(["人", "hdcms"]);
对象参数使用方法
function hd({ name, url, user = "大叔" }) {
  console.log(name, url, user);
}
hd({ name: "人", url: "houdunren.com" }); //人 houdunren.com 大叔
对象解构传参
function user(name, { sex, age } = {}) {
  console.log(name, sex, age); //大叔 男 18
}
user("大叔", { sex: "男", age: 18 });
#属性管理
#添加属性
可以为对象添加属性
let obj = { name: "人" };
obj.site = "houdunren.com";
console.log(obj);
#删除属性
使用delete 可以删除属性(后面介绍的属性特性章节可以保护属性不被删除)
let obj = { name: "人" };
delete obj.name;
console.log(obj.name); //undefined
#检测属性
hasOwnProperty检测对象自身是否包含指定的属性,不检测原型链上继承的属性。
let obj = { name: "人" };
console.log(obj.hasOwnProperty("name")); //true
下面通过数组查看
let arr = ["人"];
console.log(arr);
console.log(arr.hasOwnProperty("length")); //true
console.log(arr.hasOwnProperty("concat")); //false
console.log("concat" in arr); //true
使用 in 可以在原型对象上检测
let obj = { name: "人" };
let hd = {
  web: "houdunren.com",
};

//设置hd为obj的新原型
Object.setPrototypeOf(obj, hd);
console.log(obj);

console.log("web" in obj); //true
console.log(obj.hasOwnProperty("web")); //false
#获取属性名
使用 Object.getOwnPropertyNames 可以获取对象的属性名集合
let hd = { name: "人", year: 2010 };
const names = Object.getOwnPropertyNames(hd);
console.log(names);
// ["name", "year"]
#assign
以往我们使用类似jQuery.extend 等方法设置属性,现在可以使用 Object.assign 静态方法
从一个或多个对象复制属性
"use strict";
let hd = { a: 1, b: 2 };
hd = Object.assign(hd, { f: 1 }, { m: 9 });
console.log(hd); //{a: 1, b: 2, f: 1, m: 9}
#计算属性
对象属性可以通过表达式计算定义,这在动态设置属性或执行属性方法时很好用。
let id = 0;
const user = {
  [`id-${id++}`]: id,
  [`id-${id++}`]: id,
  [`id-${id++}`]: id,
};
console.log(user);
使用计算属性为文章定义键名
const lessons = [
  {
    title: "媒体查询响应式布局",
    category: "css",
  },
  {
    title: "FLEX 弹性盒模型",
    category: "css",
  },
  {
    title: "MYSQL多表查询随意操作",
    category: "mysql",
  },
];
let lessonObj = lessons.reduce((obj, cur, index) => {
  obj[`${cur["category"]}-${index}`] = cur;
  return obj;
}, {});
console.log(lessonObj); //{css-0: {…}, css-1: {…}, mysql-2: {…}}
console.log(lessonObj["css-0"]); //{title: "媒体查询响应式布局", category: "css"}
#传值操作
对象是引用类型赋值是传址操作,后面会介绍对象的深、浅拷贝操作
let user = {
  name: "人",
};
let hd = {
  stu: user,
};
hd.stu.name = "hdcms";
console.log(user.name); //hdcms
#遍历对象
#获取内容
使用系统提供的 API 可以方便获取对象属性与值
const hd = {
  name: "人",
  age: 10,
};
console.log(Object.keys(hd)); //["name", "age"]
console.log(Object.values(hd)); //["人", 10]
console.table(Object.entries(hd)); //[["name","人"],["age",10]]
#for/in
使用for/in遍历对象属性
const hd = {
  name: "后盾人",
  age: 10,
};
for (let key in hd) {
  console.log(key, hd[key]);
}
#for/of
for/of用于遍历迭代对象,不能直接操作对象。但Object对象的keys/方法返回的是迭代对象。
const hd = {
  name: "人",
  age: 10,
};
for (const key of Object.keys(hd)) {
  console.log(key);
}
获取所有对象属性
const hd = {
  name: "人",
  age: 10,
};
for (const key of Object.values(hd)) {
  console.log(key);
}
同时获取属性名与值
for (const array of Object.entries(hd)) {
  console.log(array);
}
使用扩展语法同时获取属性名与值
for (const [key, value] of Object.entries(hd)) {
  console.log(key, value);
}
添加元素 DOM 练习
let lessons = [
  { name: "js", click: 23 },
  { name: "node", click: 192 },
];
let ul = document.createElement("ul");
for (const val of lessons) {
  let li = document.createElement("li");
  li.innerHTML = `课程:${val.name},点击数:${val.click}`;
  ul.appendChild(li);
}
document.body.appendChild(ul);
#对象拷贝
对象赋值时复制的内存地址,所以一个对象的改变直接影响另一个
let obj = {
  name: "后盾人",
  user: {
    name: "hdcms",
  },
};
let a = obj;
let b = obj;
a.name = "lisi";
console.log(b.name); //lisi
#浅拷贝
使用for/in执行对象拷贝
let obj = { name: "后盾人" };

let hd = {};
for (const key in obj) {
  hd[key] = obj[key];
}

hd.name = "hdcms";
console.log(hd);
console.log(obj);
Object.assign 函数可简单的实现浅拷贝,它是将两个对象的属性叠加后面对象属性会覆盖前面对象同名属性。
let user = {
  name: "后盾人",
};
let hd = {
  stu: Object.assign({}, user),
};
hd.stu.name = "hdcms";
console.log(user.name); //后盾人
使用展示语法也可以实现浅拷贝
let obj = {
  name: "后盾人",
};
let hd = { ...obj };
hd.name = "hdcms";
console.log(hd);
console.log(obj);
#深拷贝
浅拷贝不会将深层的数据复制
let obj = {
  name: "后盾人",
  user: {
    name: "hdcms",
  },
};
let a = obj;
let b = obj;

function copy(object) {
  let obj = {};
  for (const key in object) {
    obj[key] = object[key];
  }
  return obj;
}
let newObj = copy(obj);
newObj.name = "hdcms";
newObj.user.name = "houdunren.com";
console.log(newObj);
console.log(obj);
是完全的复制一个对象,两个对象是完全独立的对象
let obj = {
  name: "人",
  user: {
    name: "hdcms",
  },
  data: [],
};

function copy(object) {
  let obj = object instanceof Array ? [] : {};
  for (const [k, v] of Object.entries(object)) {
    obj[k] = typeof v == "object" ? copy(v) : v;
  }
  return obj;
}

let hd = copy(obj);
hd.data.push("大军");
console.log(JSON.stringify(hd, null, 2));
console.log(JSON.stringify(obj, null, 2));
#构建函数
对象可以通过内置或自定义的构造函数创建。
#工厂函数
在函数中返回对象的函数称为工厂函数,工厂函数有以下优点
- 减少重复创建相同类型对象的代码
- 修改工厂函数的方法影响所有同类对象
使用字面量创建对象需要复制属性与方法结构
const xj = {
  name: "大军",
  show() {
    console.log(this.name);
  },
};
const hd = {
  name: "人",
  show() {
    console.log(this.name);
  },
};
使用工厂函数可以简化这个过程
function stu(name) {
  return {
    name,
    show() {
      console.log(this.name);
    },
  };
}
const lisi = stu("李四");
lisi.show();
const xj = stu("大军");
xj.show();
#构造函数
和工厂函数相似构造函数也用于创建对象,它的上下文为新的对象实例。
- 构造函数名每个单词首字母大写即
Pascal命名规范 this指当前创建的对象- 不需要返回
this系统会自动完成 - 需要使用
new关键词生成对象
function Student(name) {
  this.name = name;
  this.show = function () {
    console.log(this.name);
  };
  //不需要返回,系统会自动返回
  // return this;
}
const lisi = new Student("李四");
lisi.show();
const xj = new Student("大军");
xj.show();
如果构造函数返回对象,实例化后的对象将是此对象
function ArrayObject(...values) {
  const arr = new Array();
  arr.push.apply(arr, values);
  arr.string = function (sym = "|") {
    return this.join(sym);
  };
  return arr;
}
const array = new ArrayObject(1, 2, 3);
console.log(array);
console.log(array.string("-"));
#严格模式
在严格模式下方法中的this值为 undefined,这是为了防止无意的修改 window 对象
"use strict";
function User() {
  this.show = function () {
    console.log(this);
  };
}
let hd = new User();
hd.show(); //User

let xj = hd.show;
xj(); //undefined
#内置构造
JS 中大部分数据类型都是通过构造函数创建的。
const num = new Number(99);
console.log(num.valueOf());

const string = new String("人");
console.log(string.valueOf());

const boolean = new Boolean(true);
console.log(boolean.valueOf());

const date = new Date();
console.log(date.valueOf() * 1);

const regexp = new RegExp("\\d+");
console.log(regexp.test(99));

let hd = new Object();
hd.name = "人";
console.log(hd);
字面量创建的对象,内部也是调用了Object构造函数
const hd = {
  name: "人",
};
console.log(hd.constructor); //ƒ Object() { [native code] }

//下面是使用构造函数创建对象
const hdcms = new Object();
hdcms.title = "开源内容管理系统";
console.log(hdcms);
#对象函数
在JS中函数也是一个对象
function hd(name) {}

console.log(hd.toString());
console.log(hd.length);
函数是由系统内置的 Function 构造函数创建的
function hd(name) {}

console.log(hd.constructor);
下面是使用内置构造函数创建的函数
const User = new Function(
  `name`,
  `
  this.name = name;
  this.show = function() {
    return this.name;
  };
`
);

const lisi = new User("李四");
console.log(lisi.show());
#抽象特性
将复杂功能隐藏在内部,只开放给外部少量方法,更改对象内部的复杂逻辑不会对外部调用造成影响即抽象。
下面的手机就是抽象的好例子,只开放几个按钮给用户,复杂的工作封装在手机内部,程序也应该如此。

#问题分析
下例将对象属性封装到构造函数内部
function User(name, age) {
  this.name = name;
  this.age = age;
  this.info = function () {
    return this.age > 50 ? "中年人" : "年轻人";
  };
  this.about = function () {
    return `${this.name}是${this.info()}`;
  };
}
let lisi = new User("李四", 22);
console.log(lisi.about());
#抽象封装
上例中的方法和属性仍然可以在外部访问到,比如 info方法只是在内部使用,不需要被外部访问到这会破坏程序的内部逻辑。
下面使用闭包特性将对象进行抽象处理
function User(name, age) {
  let data = { name, age };
  let info = function () {
    return data.age > 50 ? "中年人" : "年轻人";
  };
  this.message = function () {
    return `${data.name}是${info()}`;
  };
}
let lisi = new User("人", 22);
console.log(lisi.message());
#属性特征
JS 中可以对属性的访问特性进行控制。
#查看特征
使用 Object.getOwnPropertyDescriptor查看对象属性的描述。
"use strict";
const user = {
  name: "大军",
  age: 18
};
let desc = Object.getOwnPropertyDescriptor(user, "name"`);
console.log(JSON.stringify(desc, null, 2));
使用 Object.getOwnPropertyDescriptors查看对象所有属性的描述
"use strict";
const user = {
  name: "大军",
  age: 18,
};
let desc = Object.getOwnPropertyDescriptors(user);
console.log(JSON.stringify(desc, null, 2));
属性包括以下四种特性
| 特性 | 说明 | 默认值 |
|---|---|---|
| configurable | 能否使用 delete、能否需改属性特性、或能否修改访问器属性 | true |
| enumerable | 对象属性是否可通过 for-in 循环,或 Object.keys() 读取 | true |
| writable | 对象属性是否可修改 | true |
| value | 对象属性的默认值 | undefined |
#设置特征
使用Object.defineProperty 方法修改属性特性,通过下面的设置属性 name 将不能被遍历、删除、修改。
"use strict";
const user = {
  name: "大军",
};
Object.defineProperty(user, "name", {
  value: "人",
  writable: false,
  enumerable: false,
  configurable: false,
});
通过执行以下代码对上面配置进行测试,请分别打开注释进行测试
// 不允许修改
// user.name = "大军"; //Error

// 不能遍历
// console.log(Object.keys(user));

//不允许删除
// delete user.name;
// console.log(user);

//不允许配置
// Object.defineProperty(user, "name", {
//   value: "人",
//   writable: true,
//   enumerable: false,
//   configurable: false
// });
使用 Object.defineProperties 可以一次设置多个属性,具体参数和上面介绍的一样。
"use strict";
let user = {};
Object.defineProperties(user, {
  name: { value: "大军", writable: false },
  age: { value: 18 },
});
console.log(user);
user.name = "人"; //TypeError
#禁止添加
Object.preventExtensions 禁止向对象添加属性
"use strict";
const user = {
  name: "大军",
};
Object.preventExtensions(user);
user.age = 18; //Error
Object.isExtensible 判断是否能向对象中添加属性
"use strict";
const user = {
  name: "大军",
};
Object.preventExtensions(user);
console.log(Object.isExtensible(user)); //false
#封闭对象
Object.seal()方法封闭一个对象,阻止添加新属性并将所有现有属性标记为 configurable: false
"use strict";
const user = {
  name: "人",
  age: 18,
};

Object.seal(user);
console.log(JSON.stringify(Object.getOwnPropertyDescriptors(user), null, 2));

Object.seal(user);
console.log(Object.isSealed(user));
delete user.name; //Error
Object.isSealed 如果对象是密封的则返回 true,属性都具有 configurable: false。
"use strict";
const user = {
  name: "大军",
};
Object.seal(user);
console.log(Object.isSealed(user)); //true
#冻结对象
Object.freeze 冻结对象后不允许添加、删除、修改属性,writable、configurable 都标记为false
"use strict";
const user = {
  name: "大军",
};
Object.freeze(user);
user.name = "后盾人"; //Error
Object.isFrozen()方法判断一个对象是否被冻结
"use strict";
const user = {
  name: "大军",
};
Object.freeze(user);
console.log(Object.isFrozen(user));
#属性访问器
getter 方法用于获得属性值,setter 方法用于设置属性,这是 JS 提供的存取器特性即使用函数来管理属性。
- 用于避免错误的赋值
- 需要动态监测值的改变
- 属性只能在访问器和普通属性任选其一,不能共同存在
#getter/setter
向对是地用户的年龄数据使用访问器监控控制
"use strict";
const user = {
  data: { name: "后盾人", age: null },
  set age(value) {
    if (typeof value != "number" || value > 100 || value < 10) {
      throw new Error("年龄格式错误");
    }
    this.data.age = value;
  },
  get age() {
    return `年龄是: ${this.data.age}`;
  },
};
user.age = 99;
console.log(user.age);
下面使用 getter 设置只读的课程总价
let Lesson = {
  lists: [
    { name: "js", price: 100 },
    { name: "mysql", price: 212 },
    { name: "vue.js", price: 98 },
  ],
  get total() {
    return this.lists.reduce((t, b) => t + b.price, 0);
  },
};
console.log(Lesson.total); //410
Lesson.total = 30; //无效
console.log(Lesson.total); //410
下面通过设置站网站名称与网址体验getter/setter批量设置属性的使用
const web = {
  name: "后盾人",
  url: "houdunren.com",
  get site() {
    return `${this.name} ${this.url}`;
  },
  set site(value) {
    [this.name, this.url] = value.split(",");
  },
};
web.site = "后盾人,hdcms.com";
console.log(web.site);
下面是设置 token 储取的示例,将业务逻辑使用getter/setter处理更方便,也方便其他业务的复用。
let Request = {
  get token() {
    let con = localStorage.getItem("token");
    if (!con) {
      alert("请登录后获取token");
    } else {
      return con;
    }
  },
  set token(con) {
    localStorage.setItem("token", con);
  },
};
// Request.token = 'houdunren'
console.log(Request.token);
定义内部私有属性
"use strict";
const user = {
  get name() {
    return this._name;
  },
  set name(value) {
    if (value.length <= 3) {
      throw new Error("用户名不能小于三位");
    }
    this._name = value;
  },
};
user.name = "后盾人教程";
console.log(user.name);
#访问器描述符
使用 defineProperty 可以模拟定义私有属性,从而使用面向对象的抽象特性。
function User(name, age) {
  let data = { name, age };
  Object.defineProperties(this, {
    name: {
      get() {
        return data.name;
      },
      set(value) {
        if (value.trim() == "") throw new Error("无效的用户名");
        data.name = value;
      },
    },
    age: {
      get() {
        return data.name;
      },
      set(value) {
        if (value.trim() == "") throw new Error("无效的用户名");
        data.name = value;
      },
    },
  });
}
let hd = new User("后盾人", 33);
console.log(hd.name);
hd.name = "大军1";
console.log(hd.name);
上面的代码也可以使用语法糖 class定义
"use strict";
const DATA = Symbol();
class User {
  constructor(name, age) {
    this[DATA] = { name, age };
  }
  get name() {
    return this[DATA].name;
  }
  set name(value) {
    if (value.trim() == "") throw new Error("无效的用户名");
    this[DATA].name = value;
  }
  get age() {
    return this[DATA].name;
  }
  set age(value) {
    if (value.trim() == "") throw new Error("无效的用户名");
    this[DATA].name = value;
  }
}
let hd = new User("后盾人", 33);
console.log(hd.name);
hd.name = "大军1";
console.log(hd.name);
console.log(hd);
#闭包访问器
下面结合闭包特性对属性进行访问控制
- 下例中访问器定义在函数中,并接收参数 v
- 在 get() 中通过闭包返回 v
- 在 set() 中修改了 v,这会影响 get()访问的闭包数据 v
let data = {
  name: "houdunren.com",
};
for (const [key, value] of Object.entries(data)) {
  observer(data, key, value);
}

function observer(data, key, v) {
  Object.defineProperty(data, key, {
    get() {
      return v;
    },
    set(newValue) {
      v = newValue;
    },
  });
}
data.name = "后盾人";
console.dir(data.name); //后盾人
#代理拦截
代理(拦截器)是对象的访问控制,setter/getter 是对单个对象属性的控制,而代理是对整个对象的控制。
- 读写属性时代码更简洁
- 对象的多个属性控制统一交给代理完成
- 严格模式下
set必须返回布尔值
#使用方法
"use strict";
const hd = { name: "后盾人" };
const proxy = new Proxy(hd, {
  get(obj, property) {
    return obj[property];
  },
  set(obj, property, value) {
    obj[property] = value;
    return true;
  },
});
proxy.age = 10;
console.log(hd);
#代理函数
如果代理以函数方式执行时,会执行代理中定义 apply 方法。
- 参数说明:函数,上下文对象,参数
下面使用 apply 计算函数执行时间
function factorial(num) {
  return num == 1 ? 1 : num * factorial(num - 1);
}
let proxy = new Proxy(factorial, {
  apply(func, obj, args) {
    console.time("run");
    func.apply(obj, args);
    console.timeEnd("run");
  },
});
proxy.apply(this, [1, 2, 3]);
#截取字符
下例中对数组进行代理,用于截取标题操作
const stringDot = {
  get(target, key) {
    const title = target[key].title;
    const len = 5;
    return title.length > len ? title.substr(0, len) + ".".repeat(3) : title;
  },
};
const lessons = [
  {
    title: "媒体查询响应式布局",
    category: "css",
  },
  {
    title: "FLEX 弹性盒模型",
    category: "css",
  },
  {
    title: "MYSQL多表查询随意操作",
    category: "mysql",
  },
];
const stringDotProxy = new Proxy(lessons, stringDot);
console.log(stringDotProxy[0]);
#双向绑定
下面通过代理实现vue 等前端框架的数据绑定特性特性。

<body>
<input type="text" v-model="title" />
<input type="text" v-model="title" />
<div v-bind="title"></div>
</body>
<script>
function View() {
    //设置代理拦截
  let proxy = new Proxy(
    {},
    {
      get(obj, property) {},
      set(obj, property, value) {
        obj[property] = value;
        document
          .querySelectorAll(
            `[v-model="${property}"],[v-bind="${property}"]`
          )
          .forEach(el => {
            el.innerHTML = value;
            el.value = value;
          });
      }
    }
  );
  //初始化绑定元素事件
  this.run = function() {
    const els = document.querySelectorAll("[v-model]");
    els.forEach(item => {
      item.addEventListener("keyup", function() {
        proxy[this.getAttribute("v-model")] = this.value;
      });
    });
  };
}
let view = new View().run();
#表单验证

<style>
  body {
    padding: 50px;
    background: #34495e;
  }
  input {
    border: solid 10px #ddd;
    height: 30px;
  }
  .error {
    border: solid 10px red;
  }
</style>
<body>
  <input type="text" validate rule="max:12,min:3" />
  <input type="text" validate rule="max:3,isNumber" />
</body>
<script>
  "use strict";
  //验证处理类
  class Validate {
    max(value, len) {
      return value.length <= len;
    }
    min(value, len) {
      return value.length >= len;
    }
    isNumber(value) {
      return /^\d+$/.test(value);
    }
  }

  //代理工厂
  function makeProxy(target) {
    return new Proxy(target, {
      get(target, key) {
        return target[key];
      },
      set(target, key, el) {
        const rule = el.getAttribute("rule");
        const validate = new Validate();
        let state = rule.split(",").every(rule => {
          const info = rule.split(":");
          return validate[info[0]](el.value, info[1]);
        });
        el.classList[state ? "remove":"add"]("error");
        return true;
      }
    });
  }

  const nodes = makeProxy(document.querySelectorAll("[validate]"));
  nodes.forEach((item, i) => {
    item.addEventListener("keyup", function() {
      nodes[i] = this;
    });
  });
</script>
#JSON
- json 是一种轻量级的数据交换格式,易于人阅读和编写。
- 使用
json数据格式是替换xml的最佳方式,主流语言都很好的支持json格式。所以json也是前后台传输数据的主要格式。 - json 标准中要求使用双引号包裹属性,虽然有些语言不强制,但使用双引号可避免多程序间传输发生错误语言错误的发生。
#声明定义
基本结构
let hd = {
  title: "后盾人",
  url: "houdunren.com",
  teacher: {
    name: "大军大叔",
  },
};
console.log(hd.teacher.name);
数组结构
let lessons = [
  {
    title: "媒体查询响应式布局",
    category: "css",
    click: 199,
  },
  {
    title: "FLEX 弹性盒模型",
    category: "css",
    click: 12,
  },
  {
    title: "MYSQL多表查询随意操作",
    category: "mysql",
    click: 89,
  },
];

console.log(lessons[0].title);
#序列化
序列化是将 json 转换为字符串,一般用来向其他语言传输使用。
let hd = {
  title: "后盾人",
  url: "houdunren.com",
  teacher: {
    name: "大军大叔",
  },
};
console.log(JSON.stringify(hd));
//{"title":"后盾人","url":"houdunren.com","teacher":{"name":"大军大叔"}}
根据第二个参数指定保存的属性
console.log(JSON.stringify(hd, ["title", "url"]));
//{"title":"后盾人","url":"houdunren.com"}
第三个是参数用来控制 TAB 数量,如果字符串则为前导字符。
let hd = {
  title: "后盾人",
  url: "houdunren.com",
  teacher: {
    name: "大军大叔",
  },
};
console.log(JSON.stringify(hd, null, 4));
为数据添加 toJSON 方法来自定义返回格式
let hd = {
  title: "后盾人",
  url: "houdunren.com",
  teacher: {
    name: "大军大叔",
  },
  toJSON: function () {
    return {
      title: this.url,
      name: this.teacher.name,
    };
  },
};
console.log(JSON.stringify(hd)); //{"title":"houdunren.com","name":"大军大叔"}
#反序列化
使用 JSON.parse 将字符串 json 解析成对象
let hd = {
  title: "后盾人",
  url: "houdunren.com",
  teacher: {
    name: "大军大叔",
  },
};
let jsonStr = JSON.stringify(hd);
console.log(JSON.parse(jsonStr));
使用第二个参数函数来对返回的数据二次处理
let hd = {
  title: "后盾人",
  url: "houdunren.com",
  teacher: {
    name: "大军大叔",
  },
};
let jsonStr = JSON.stringify(hd);
console.log(
  JSON.parse(jsonStr, (key, value) => {
    if (key == "title") {
      return `[推荐] ${value}`;
    }
    return value;
  })
);
#Reflect
Reflect 是一个内置的对象,它提供拦截 JavaScript 操作的方法
Reflect并非一个构造函数,所以不能通过 new 运算符对其进行调用
原型基础
#原型对象
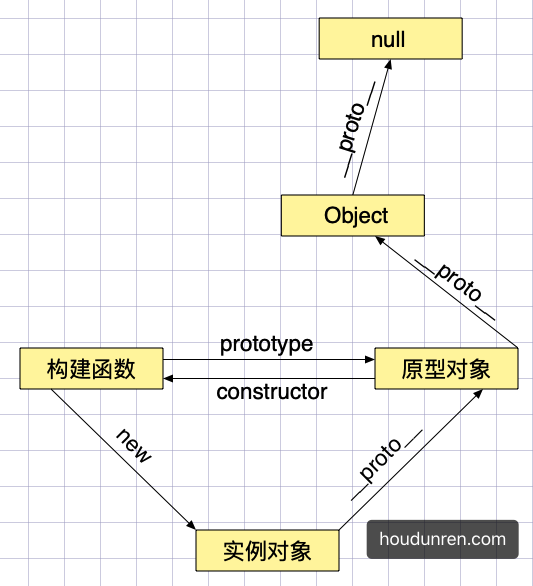
每个对象都有一个原型prototype对象,通过函数创建的对象也将拥有这个原型对象。原型是一个指向对象的指针。
- 可以将原型理解为对象的父亲,对象从原型对象继承来属性
- 原型就是对象除了是某个对象的父母外没有什么特别之处
- 所有函数的原型默认是
Object的实例,所以可以使用toString/toValues/isPrototypeOf等方法的原因 - 使用原型对象为多个对象共享属性或方法
- 如果对象本身不存在属性或方法将到原型上查找
- 使用原型可以解决,通过构建函数创建对象时复制多个函数造成的内存占用问题
- 原型包含
constructor属性,指向构造函数 - 对象包含
__proto__指向他的原型对象
下例使用的就是数组原型对象的 concat 方法完成的连接操作
let hd = ["a"];
console.log(hd.concat("b"));
console.log(hd);
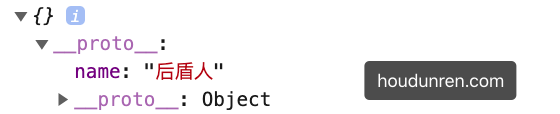
默认情况下创建的对象都有原型

let hd = { name: "后盾人" };
console.log(hd);
以下 x、y 的原型都为元对象 Object,即 JS 中的根对象
let x = {};
let y = {};
console.log(Object.getPrototypeOf(x) == Object.getPrototypeOf(y)); //true
我们也可以创建一个极简对象(纯数据字典对象)没有原型(原型为 null)

let hd = { name: 3 };
console.log(hd.hasOwnProperty("name"));

let xj = Object.create(null, {
  name: {
    value: "大军",
  },
});
console.log(xj.hasOwnProperty("name")); //Error

//Object.keys是静态方法,不是原型方法所以是可以使用的
console.log(Object.keys(xj));
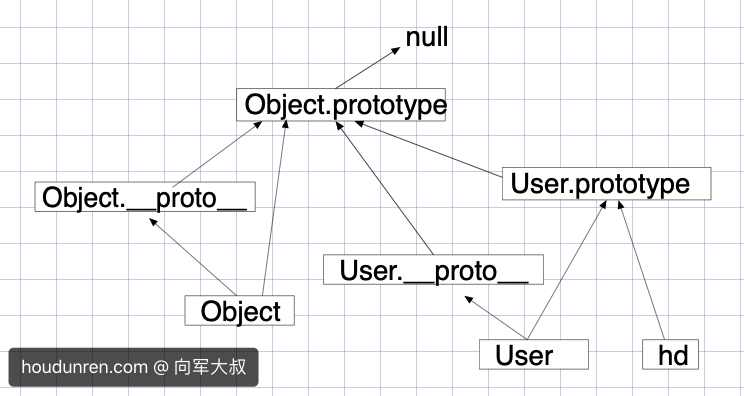
函数拥有多个原型,prototype 用于实例对象使用,__proto__用于函数对象使用
function User() {}
User.__proto__.view = function () {
  console.log("User function view method");
};
User.view();

User.prototype.show = function () {
  console.log("后盾人");
};
let hd = new User();
hd.show();
console.log(User.prototype == hd.__proto__);
下面是原型关系分析,与方法继承的示例
let hd = new Object();
hd.name = "后盾人";
Object.prototype.show = function () {
  console.log("hodunren.com");
};
hd.show();

function User() {}
let xj = new User();
xj.show();
User.show();
下面是使用构造函数创建对象的原型体现
- 构造函数拥有原型
- 创建对象时构造函数把原型赋予对象
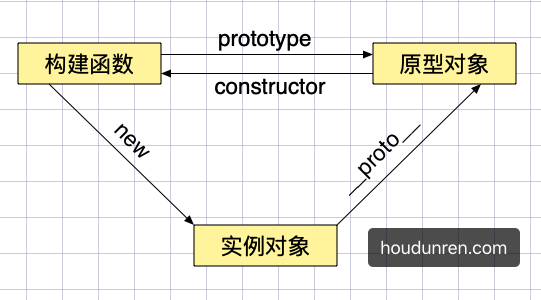
function User() {}
let xj = new User();
console.log(xj.__proto__ == User.prototype);
下面使用数组会产生多级继承即原型链
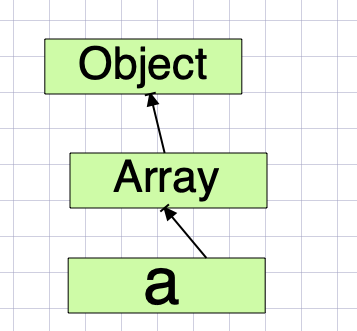
let hd = [];
console.log(hd);
console.log(hd.__proto__ == Array.prototype);

let str = "";
console.log(str.__proto__ == String.prototype);
下面使用 setPrototypeOf 与 getPrototypeOf 获取与设置原型
let hd = {};
let parent = { name: "parent" };
Object.setPrototypeOf(hd, parent);
console.log(hd);
console.log(Object.getPrototypeOf(hd));
使用自定义构造函数创建的对象的原型体现
function User() {}
let hd = new User();
console.log(hd);
constructor 存在于 prototype 原型中,用于指向构建函数的引用。
function hd() {
  this.show = function () {
    return "show method";
  };
}
const obj = new hd(); //true
console.log(obj instanceof hd);

const obj2 = new obj.constructor();
console.dir(obj2.show()); //show method
使用对象的 constructor 创建对象
function User(name, age) {
  this.name = name;
  this.age = age;
}

function createByObject(obj, ...args) {
  const constructor = Object.getPrototypeOf(obj).constructor;
  return new constructor(...args);
}

let hd = new User("后盾人");
let xj = createByObject(hd, "大军", 12);
console.log(xj);
#原型链
通过引用类型的原型,继承另一个引用类型的属性与方法,这就是实现继承的步骤。
使用Object.setPrototypeOf 可设置对象的原型,下面的示例中继承关系为 obj>hd>cms。
Object.getPrototypeOf 用于获取一个对象的原型。
let obj = {
  name: "后盾人",
};
let hd = {
  web: "houdunren",
};
let cms = {
  soft: "hdcms",
};
//让obj继承hd,即设置obj的原型为hd
Object.setPrototypeOf(obj, hd);
Object.setPrototypeOf(hd, cms);
console.log(obj.web);
console.log(Object.getPrototypeOf(hd) == cms); //true
#原型检测
instanceof 检测构造函数的 prototype 属性是否出现在某个实例对象的原型链上
function A() {}
function B() {}
function C() {}

const c = new C();
B.prototype = c;
const b = new B();
A.prototype = b;
const a = new A();

console.dir(a instanceof A); //true
console.dir(a instanceof B); //true
console.dir(a instanceof C); //true
console.dir(b instanceof C); //true
console.dir(c instanceof B); //false
使用isPrototypeOf检测一个对象是否是另一个对象的原型链中
const a = {};
const b = {};
const c = {};

Object.setPrototypeOf(a, b);
Object.setPrototypeOf(b, c);

console.log(b.isPrototypeOf(a)); //true
console.log(c.isPrototypeOf(a)); //true
console.log(c.isPrototypeOf(b)); //true
#属性遍历
使用in 检测原型链上是否存在属性,使用 hasOwnProperty 只检测当前对象
let a = { url: "houdunren" };
let b = { name: "后盾人" };
Object.setPrototypeOf(a, b);
console.log("name" in a);
console.log(a.hasOwnProperty("name"));
console.log(a.hasOwnProperty("url"));
使用 for/in 遍历时同时会遍历原型上的属性如下例
let hd = { name: "后盾人" };
let xj = Object.create(hd, {
  url: {
    value: "houdunren.com",
    enumerable: true,
  },
});
for (const key in xj) {
  console.log(key);
}
hasOwnProperty 方法判断对象是否存在属性,而不会查找原型。所以如果只想遍历对象属性使用以下代码
let hd = { name: "后盾人" };
let xj = Object.create(hd, {
  url: {
    value: "houdunren.com",
    enumerable: true,
  },
});
for (const key in xj) {
  if (xj.hasOwnProperty(key)) {
    console.log(key);
  }
}
#借用原型
使用 call 或 apply 可以借用其他原型方法完成功能。
下面的 xj 对象不能使用max方法,但可以借用 hd 对象的原型方法
let hd = {
  data: [1, 2, 3, 4, 5],
};
Object.setPrototypeOf(hd, {
  max: function () {
    return this.data.sort((a, b) => b - a)[0];
  },
});
console.log(hd.max());

let xj = {
  lessons: { js: 100, php: 78, node: 78, linux: 125 },
  get data() {
    return Object.values(this.lessons);
  },
};
console.log(hd.__proto__.max.apply(xj));
上例中如果方法可以传参,那就可以不在 xj 对象中定义 getter 方法了
let hd = {
  data: [1, 2, 3, 4, 5],
};
Object.setPrototypeOf(hd, {
  max: function (data) {
    return data.sort((a, b) => b - a)[0];
  },
});
console.log(hd.max(hd.data));

let xj = {
  lessons: { js: 100, php: 78, node: 78, linux: 125 },
};
console.log(hd.__proto__.max.call(xj, Object.values(xj.lessons)));
因为 Math.max 就是获取最大值的方法,所以代码可以再次优化
let hd = {
  data: [1, 2, 3, 4, 5],
};
console.log(Math.max.apply(null, Object.values(hd.data)));

let xj = {
  lessons: { js: 100, php: 78, node: 78, linux: 125 },
};
console.log(Math.max.apply(xj, Object.values(xj.lessons)));
下面是获取设置了 class 属性的按钮,但 DOM 节点不能直接使用数组的filter 等方法,但借用数组的原型方法就可以操作了。
<body>
  <button message="后盾人" class="red">后盾人</button>
  <button message="hdcms">hdcms</button>
</body>
<script>
  let btns = document.querySelectorAll("button");
  btns = Array.prototype.filter.call(btns, item => {
    return item.hasAttribute("class");
  });
</script>
#this
this 不受原型继承影响,this 指向调用属性时使用的对象。
let hd = {
  name: "后盾人",
};
let houdunren = {
  name: "大军",
  show() {
    return this.name;
  },
};
hd.__proto__ = houdunren;
console.log(hd.show()); //后盾人
#原型总结
#prototype
函数也是对象也有原型,函数有 prototype 属性指向他的原型
为构造函数设置的原型指,当使用构造函数创建对象时把这个原型赋予给这个对象
function User(name) {
  this.name = name;
}
User.prototype = {
  show() {
    return this.name;
  },
};
let xj = new User("大军");
console.log(xj.show());
函数默认prototype 指包含一个属性 constructor 的对象,constructor 指向当前构造函数
function User(name) {
  this.name = name;
}
let xj = new User("大军");
console.log(xj);
console.log(User.prototype.constructor == User); //true
console.log(xj.__proto__ == User.prototype); //true

let lisi = new xj.constructor("李四");
console.log(lisi.__proto__ == xj.__proto__); //true
原型中保存引用类型会造成对象共享属性,所以一般只会在原型中定义方法。
function User() {}
User.prototype = {
  lessons: ["JS", "VUE"],
};
const lisi = new User();
const wangwu = new User();

lisi.lessons.push("CSS");

console.log(lisi.lessons); //["JS", "VUE", "CSS"]
console.log(wangwu.lessons); //["JS", "VUE", "CSS"]
为 Object 原型对象添加方法,将影响所有函数
<body>
  <button onclick="this.hide()">后盾人</button>
</body>
<script>
  Object.prototype.hide = function() {
    this.style.display = "none";
  };
</script>
了解了原型后可以为系统对象添加方法,比如为字符串添加了一截断函数。
- 不能将系统对象的原型直接赋值
String.prototype.truncate = function (len = 5) {
  return this.length <= len ? this : this.substr(0, len) + "...";
};
console.log("后盾人每天不断视频教程".truncate(3)); //后盾人...
#Object.create
使用Object.create创建一个新对象时使用现有对象做为新对象的原型对象
使用Object.create 设置对象原型
let user = {
  show() {
    return this.name;
  },
};

let hd = Object.create(user);
hd.name = "大军";
console.log(hd.show());
强以在设置时使用第二个参数设置新对象的属性
let user = {
  show() {
    return this.name;
  },
};
let hd = Object.create(user, {
  name: {
    value: "后盾人",
  },
});
console.log(hd);
#__proto__
在实例化对象上存在 __proto__ 记录了原型,所以可以通过对象访问到原型的属性或方法。
__proto__不是对象属性,理解为prototype的getter/setter实现,他是一个非标准定义__proto__内部使用getter/setter控制值,所以只允许对象或 null- 建议使用
Object.setPrototypeOf与Object.getProttoeypOf替代__proto__
下面修改对象的 __proto__ 是不会成功的,因为_proto__ 内部使用getter/setter 控制值,所以只允许对象或 null
let xj = {};
xj.__proto__ = "大军";
console.log(xj);
下面定义的__proto__ 就会成功,因为这是一个极简对象,没有原型对象所以不会影响__proto__赋值。
let hd = Object.create(null);
hd.__proto__ = "大军";
console.log(hd); //{__proto__: "大军"}
下面通过改变对象的 __proto__ 原型对象来实现继承,继承可以实现多层,
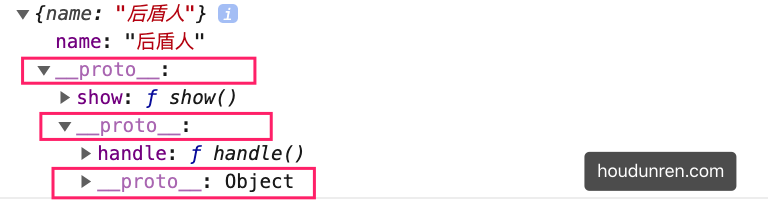
let hd = {
  name: "后盾人",
};
let houdunren = {
  show() {
    return this.name;
  },
};
let xj = {
  handle() {
    return `用户: ${this.name}`;
  },
};
houdunren.__proto__ = xj;
hd.__proto__ = houdunren;
console.log(hd.show());
console.log(hd.handle());
console.log(hd);
构造函数中的 __proto__ 使用
function User(name, age) {
  this.name = name;
  this.age = age;
}
User.prototype.show = function () {
  return `姓名:${this.name},年龄:${this.age}`;
};
let lisi = new User("李四", 12);
let xiaoming = new User("小明", 32);
console.log(lisi.__proto__ == User.prototype); //true
可以使用 __proto__ 或 Object.setPrototypeOf 设置对象的原型,使用Object.getProttoeypOf 获取对象原型。
function Person() {
  this.getName = function () {
    return this.name;
  };
}
function User(name, age) {
  this.name = name;
  this.age = age;
}
let lisi = new User("李四", 12);
Object.setPrototypeOf(lisi, new Person());
console.log(lisi.getName()); //李四
对象设置属性,只是修改对象属性并不会修改原型属性,使用hasOwnProperty 判断对象本身是否含有属性并不会检测原型。
function User() {}
const lisi = new User();
const wangwu = new User();

lisi.name = "小明";
console.log(lisi.name);
console.log(lisi.hasOwnProperty("name"));

//修改原型属性后
lisi.__proto__.name = "张三";
console.log(wangwu.name);

//删除对象属性后
delete lisi.name;
console.log(lisi.hasOwnProperty("name"));
console.log(lisi.name);
使用 in 会检测原型与对象,而 hasOwnProperty 只检测对象,所以结合后可判断属性是否在原型中
function User() {}
User.prototype.name = "后盾人";
const lisi = new User();
//in会在原型中检测
console.log("name" in lisi);
//hasOwnProperty 检测对象属性
console.log(lisi.hasOwnProperty("name"));
#使用建议
通过前介绍我们知道可以使用多种方式设置原型,下面是按时间顺序的排列
prototype构造函数的原型属性Object.create创建对象时指定原型__proto__声明自定义的非标准属性设置原型,解决之前通过Object.create定义原型,而没提供获取方法Object.setPrototypeOf设置对象原型
这几种方式都可以管理原型,一般以我个人情况来讲使用 prototype 更改构造函数原型,使用 Object.setPrototypeOf 与 Object.getPrototypeOf 获取或设置原型。
#构造函数
#原型属性
构造函数在被new 时把构造函数的原型(prototype)赋值给新对象。如果对象中存在属性将使用对象属性,不再原型上查找方法。
- 构造函数只会产生一个原型对象
function hd() {
  this.show = function () {
    return "show in object";
  };
}
hd.prototype.show = function () {
  return "show in prototype";
};
const obj = new hd();
console.log(obj.show());
对象的原型引用构造函数的原型对象,是在创建对象时确定的,当构造函数原型对象改变时会影响后面的实例对象。
function hd() {}
hd.prototype.name = "hdcms";
const obj1 = new hd();
console.log(obj1.name); //hdcms

hd.prototype = {
  name: "后盾人",
};
const obj2 = new hd();
console.dir(obj2.name); //后盾人
#constructor
构造函数的原型中包含属性 constructor 指向该构造函数,以下代码说明了这一点
function User(name) {
  this.name = name;
}
let hd = new User("后盾人");
let xj = new hd.constructor("大军");
console.log(xj);
以下代码直接设置了构造函数的原型将造成 constructor 丢失
function User(name) {
  this.name = name;
}
User.prototype = {
  show: function () {},
};

let hd = new User("后盾人");
let xj = new hd.constructor("大军");
console.log(xj); //String {"大军"}
正确的做法是要保证原型中的 constructor指向构造函数
function User(name) {
  this.name = name;
}
User.prototype = {
  constructor: User,
  show: function () {},
};

let hd = new User("后盾人");
let xj = new hd.constructor("大军");
console.log(xj);
#使用优化
使用构造函数会产生函数复制造成内存占用,及函数不能共享的问题。
function User(name) {
  this.name = name;
  this.get = function () {
    return this.name;
  };
}
let lisi = new User("小明");
let wangwu = new User("王五");
console.log(lisi.get == wangwu.get); //false
体验通过原型定义方法不会产生函数复制
function User(name) {
  this.name = name;
}
User.prototype.get = function () {
  return "后盾人" + this.name;
};
let lisi = new User("小明");

let wangwu = new User("王五");
console.log(lisi.get == wangwu.get); //true
//通过修改原型方法会影响所有对象调用,因为方法是共用的
lisi.__proto__.get = function () {
  return "后盾人" + this.name;
};
console.log(lisi.get());
console.log(wangwu.get());
下面演示使用原型为多个实例共享属性
function User(name, age) {
  this.name = name;
  this.age = age;
  this.show = () => {
    return `你在${this.site}的姓名:${this.name},年龄:${this.age}`;
  };
}
User.prototype.site = "后盾人";
let lisi = new User("李四", 12);
let xiaoming = new User("小明", 32);

console.log(lisi.show()); //你在后盾人的姓名:李四,年龄:12
console.log(xiaoming.show()); //你在后盾人的姓名:小明,年龄:32
将方法定义在原型上为对象共享,解决通过构造函数创建对象函数复制的内存占用问题
function User(name) {
  this.name = name;
}
User.prototype.get = function () {
  return "后盾人" + this.name;
};
let lisi = new User("小明");

let wangwu = new User("王五");
console.log(lisi.get == wangwu.get); //true
//通过修改原型方法会影响所有对象调用,因为方法是共用的
lisi.__proto__.get = function () {
  return "后盾人" + this.name;
};
console.log(lisi.get());
console.log(lisi.get());
console.log(wangwu.get());
使用Object.assign一次设置原型方法来复用,后面会使用这个功能实现 Mixin 模式
function User(name, age) {
  this.name = name;
  this.age = age;
}
Object.assign(User.prototype, {
  getName() {
    return this.name;
  },
  getAge() {
    return this.age;
  },
});
let lisi = new User("李四", 12);
let xiaoming = new User("小明", 32);
console.log(lisi.getName()); //李四
console.log(lisi.__proto__);
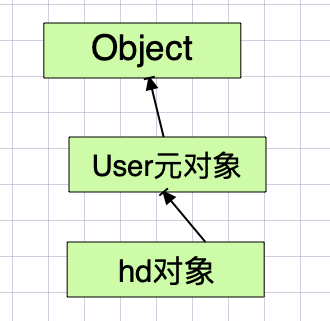
#体验继承
下面为 Stu 更改了原型为User 的实例对象,lisi是通过构造函数Stu创建的实例对象
lisi在执行getName方法时会从自身并向上查找原型,这就是原型链特性- 当然如果把
getName添加到对象上,就不继续追溯原型链了
"use strict";
function User() {}
User.prototype.getName = function () {
  return this.name;
};

function Stu(name) {
  this.name = name;
}
Stu.prototype = new User();
const lisi = new Stu("李四");

console.log(lisi.__proto__);
console.log(lisi.getName());
#继承与多态
当对象中没使用的属性时,JS 会从原型上获取这就是继承在 JavaScript 中的实现。
#继承实现
下面使用Object.create 创建对象,做为Admin、Member的原型对象来实现继承。
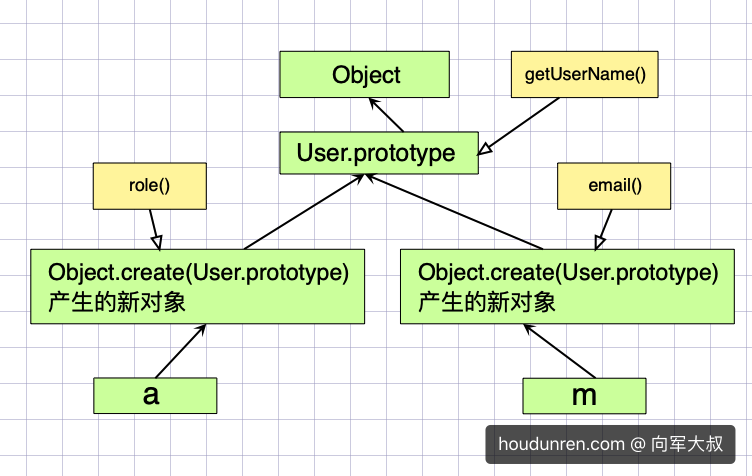
function User() {}
User.prototype.getUserName = function () {};

function Admin() {}
Admin.prototype = Object.create(User.prototype);
Admin.prototype.role = function () {};

function Member() {}
Member.prototype = Object.create(User.prototype);
Member.prototype.email = function () {};
console.log(new Admin());
console.log(new Member());
不能使用以下方式操作,因为这样会改变 User 的原型方法,这不是继承,这是改变原型
...
function User() {}
User.prototype.getUserName = function() {};

function Admin() {}
Admin.prototype = User.prototype;
Admin.prototype.role = function() {};
...
#构造函数
有多种方式通过构造函数创建对象
function Admin() {}
console.log(Admin == Admin.prototype.constructor); //true

let hd = new Admin.prototype.constructor();
console.log(hd);

let xj = new Admin();
console.log(xj);
因为有时根据得到的对象获取构造函数,然后再创建新对象所以需要保证构造函数存在,但如果直接设置了 Admin.prototype 属性会造成constructor丢失,所以需要再次设置constructor值。
function User() {}
function Admin() {}

Admin.prototype = Object.create(User.prototype);
Admin.prototype.role = function () {};

let xj = new Admin();
console.log(xj.constructor); //constructor丢失,返回User构造函数

Admin.prototype.constructor = Admin;

let hd = new Admin();
console.log(hd.constructor); //正确返回Admin构造函数

//现在可以通过对象获取构造函数来创建新对象了
console.log(new hd.constructor());
使用Object.defineProperty定义来禁止遍历 constructor 属性
function User() {}
function Admin(name) {
  this.name = name;
}

Admin.prototype = Object.create(User.prototype);

Object.defineProperty(Admin.prototype, "constructor", {
  value: Admin,
  enumerable: false, //禁止遍历
});

let hd = new Admin("后盾人");
for (const key in hd) {
  console.log(key);
}
完全重写构建函数原型,只对后面应用对象有效
function User() {}
const lisi = new User();
User.prototype = {
  show() {
    return "prototype show";
  },
};
const wangwu = new User();
console.log(wangwu.show());

console.log(lisi.show()); // lisi.show is not a function
#方法重写
下而展示的是子类需要重写父类方法的技巧。
function Person() {}
Person.prototype.getName = function () {
  console.log("parent method");
};

function User(name) {}
User.prototype = Object.create(Person.prototype);
User.prototype.constructor = User;

User.prototype.getName = function () {
  //调用父级同名方法
  Person.prototype.getName.call(this);
  console.log("child method");
};
let hd = new User();
hd.getName();
#多态
根据多种不同的形态产生不同的结果,下而会根据不同形态的对象得到了不同的结果。
function User() {}
User.prototype.show = function () {
  console.log(this.description());
};

function Admin() {}
Admin.prototype = Object.create(User.prototype);
Admin.prototype.description = function () {
  return "管理员在此";
};

function Member() {}
Member.prototype = Object.create(User.prototype);
Member.prototype.description = function () {
  return "我是会员";
};

function Enterprise() {}
Enterprise.prototype = Object.create(User.prototype);
Enterprise.prototype.description = function () {
  return "企业帐户";
};

for (const obj of [new Admin(), new Member(), new Enterprise()]) {
  obj.show();
}
#深挖继承
继承是为了复用代码,继承的本质是将原型指向到另一个对象。
#构造函数
我们希望调用父类构造函数完成对象的属性初始化,但像下面这样使用是不会成功的。因为此时 this 指向了 window,无法为当前对象声明属性。
function User(name) {
  this.name = name;
  console.log(this); // Window
}
User.prototype.getUserName = function () {
  return this.name;
};

function Admin(name) {
  User(name);
}
Admin.prototype = Object.create(User.prototype);
Admin.prototype.role = function () {};

let xj = new Admin("大军大叔");
console.log(xj.getUserName()); //undefined
解决上面的问题是使用 call/apply 为每个生成的对象设置属性
function User(name) {
  this.name = name;
  console.log(this); // Admin
}
User.prototype.getUserName = function () {
  return this.name;
};

function Admin(name) {
  User.call(this, name);
}
Admin.prototype = Object.create(User.prototype);

let xj = new Admin("大军大叔");
console.log(xj.getUserName()); //大军大叔
#原型工厂
原型工厂是将继承的过程封装,使用继承业务简单化。
function extend(sub, sup) {
  sub.prototype = Object.create(sup.prototype);
  sub.prototype.constructor = sub;
}

function Access() {}
function User() {}
function Admin() {}
function Member() {}

extend(User, Access); //User继承Access
extend(Admin, User); //Admin继承User
extend(Member, Access); //Member继承Access

Access.prototype.rules = function () {};
User.prototype.getName = function () {};

console.log(new Admin()); // 继承关系: Admin>User>Access>Object
console.log(new Member()); //继承关系:Member>Access>Object
#对象工厂
在原型继承基础上,将对象的生成使用函数完成,并在函数内部为对象添加属性或方法。
function User(name, age) {
  this.name = name;
  this.age = age;
}
User.prototype.show = function () {
  console.log(this.name, this.age);
};

function Admin(name, age) {
  let instance = Object.create(User.prototype);
  User.call(instance, name, age);
  instance.role = function () {
    console.log("admin.role");
  };
  return instance;
}
let hd = Admin("后盾人", 19);
hd.show();

function member(name, age) {
  let instance = Object.create(User.prototype);
  User.call(instance, name, age);
  return instance;
}
let lisi = member("李四", 28);
lisi.show();
#Mixin 模式
JS不能实现多继承,如果要使用多个类的方法时可以使用mixin混合模式来完成。
mixin类是一个包含许多供其它类使用的方法的类mixin类不用来继承做为其它类的父类
其他语言也有类似的操作比如
php语言中可以使用trait完成类似操作。
下面是示例中 Admin需要使用 Request.prototype 与 Credit 的功能,因为JS 是单继承,我们不得不将无关的类连接在一下,显然下面的代码实现并不佳
function extend(sub, sup) {
  sub.prototype = Object.create(sup.prototype);
  sub.prototype.constructor = sub;
}
function Credit() {}
function Request() {}
function User(name, age) {
  this.name = name;
  this.age = age;
}
extend(Request, Credit);
extend(User, Request);
Credit.prototype.total = function () {
  console.log("统计积分");
};
Request.prototype.ajax = function () {
  console.log("请求后台");
};
User.prototype.show = function () {
  console.log(this.name, this.age);
};
function Admin(...args) {
  User.apply(this, args);
}
extend(Admin, User);
let hd = new Admin("大军", 19);
hd.show();
hd.total(); //统计积分
hd.ajax(); //请求后台
下面分拆功能使用 Mixin 实现多继承,使用代码结构更清晰。只让 Admin 继承 User 原型
function extend(sub, sup) {
  sub.prototype = Object.create(sup.prototype);
  sub.prototype.constructor = sub;
}
function User(name, age) {
  this.name = name;
  this.age = age;
}
User.prototype.show = function () {
  console.log(this.name, this.age);
};
const Credit = {
  total() {
    console.log("统计积分");
  },
};
const Request = {
  ajax() {
    console.log("请求后台");
  },
};

function Admin(...args) {
  User.apply(this, args);
}
extend(Admin, User);
Object.assign(Admin.prototype, Request, Credit);
let hd = new Admin("大军", 19);
hd.show();
hd.total(); //统计积分
hd.ajax(); //请求后台
mixin 类也可以继承其他类,比如下面的 Create 类获取积分要请求后台,就需要继承 Request 来完成。
super是在mixin类的原型中查找,而不是在User原型中
function extend(sub, sup) {
  sub.prototype = Object.create(sup.prototype);
  sub.prototype.constructor = sub;
}
function User(name, age) {
  this.name = name;
  this.age = age;
}
User.prototype.show = function () {
  console.log(this.name, this.age);
};
const Request = {
  ajax() {
    return "请求后台";
  },
};
const Credit = {
  __proto__: Request,
  total() {
    console.log(super.ajax() + ",统计积分");
  },
};

function Admin(...args) {
  User.apply(this, args);
}
extend(Admin, User);
Object.assign(Admin.prototype, Request, Credit);
let hd = new Admin("大军", 19);
hd.show();
hd.total(); //统计积分
hd.ajax(); //请求后台
#实例操作
使用 call/apply 制作选项卡
<style>
  * {
    padding: 0;
    margin: 0;
  }

  body {
    display: flex;
    justify-content: center;
    align-items: center;
    width: 100vw;
    height: 100vh;
  }

  main {
    width: 400px;
    flex-direction: column;
    position: relative;
    margin-right: 20px;
  }

  main nav {
    display: flex;
    height: 50px;
    align-items: center;
  }

  main nav a {
    background: #95a5a6;
    margin-right: px;
    padding: 10px 20px;
    border: solid 1px #333;
    color: #fff;
    text-decoration: none;
  }

  main nav a:first-of-type {
    background: #e67e22;
  }

  section {
    height: 200px;
    width: 100%;
    background: #f1c40f;
    position: absolute;
    font-size: 5em;
    display: none;
  }

  .hd-tab section:first-of-type {
    display: block;
  }

  section:nth-child(even) {
    background: #27ae60;
  }
</style>

<body>
  <main class="tab1">
    <nav>
      <a href="javascript:;">后盾人</a>
      <a href="javascript:;">hdcms</a>
    </nav>
    <section>1</section>
    <section>2</section>
  </main>
  <main class="tab2">
    <nav>
      <a href="javascript:;">后盾人</a>
      <a href="javascript:;">hdcms</a>
    </nav>
    <section>1</section>
    <section>2</section>
  </main>
</body>

<script>
    //继承工厂
  function extend(sub, sup) {
    sub.prototype = Object.create(sup.prototype);
    sub.prototype.constructor = sub;
  }

  //动作类
  function Animation() {}
  Animation.prototype.show = function() {
    this.style.display = "block";
  };
  //隐藏所有元素
  Animation.prototype.hide = function() {
    this.style.display = "none";
  };
  //必变元素集合背景
  Animation.prototype.background = function(color) {
    this.style.background = color;
  };

    //选项卡类
  function Tab(tab) {
    this.tab = tab;
    this.links = null;
    this.sections = null;
  }
  extend(Tab, Animation);
  Tab.prototype.run = function() {
    this.links = this.tab.querySelectorAll("a");
    this.sections = this.tab.querySelectorAll("section");
    this.bindEvent();
    this.action(0);
  };
  //绑定事件
  Tab.prototype.bindEvent = function() {
    this.links.forEach((el, i) => {
      el.addEventListener("click", () => {
        this.reset();
        this.action(i);
      });
    });
  };
  //点击后触发动作
  Tab.prototype.action = function(i) {
    this.background.call(this.links[i], "#e67e22");
    this.show.call(this.sections[i]);
  };
  //重置link与section
  Tab.prototype.reset = function() {
    this.links.forEach((el, i) => {
      this.background.call(el, "#95a5a6");
      this.hide.call(this.sections[i]);
    });
  };

  new Tab(document.querySelector(".tab1")).run();
  new Tab(document.querySelector(".tab2")).run();
</script>
基础知识
为了和其他语言继承形态一致,JS 提供了class 关键词用于模拟传统的class ,但底层实现机制依然是原型继承。
class 只是语法糖为了让类的声明与继承更加简洁清晰。
#声明定义
可以使用类声明和赋值表达式定义类,推荐使用类声明来定义类
//类声明
class User {}
console.log(new Article());
let Article = class {};
console.log(new User());
类方法间不需要逗号
class User {
  show() {}
  get() {
    console.log("get method");
  }
}
const hd = new User();
hd.get();
#构造函数
使用 constructor 构造函数传递参数,下例中show为构造函数方法,getName为原型方法
constructor会在 new 时自动执行
class User {
  constructor(name) {
    this.name = name;
    this.show = function () {};
  }
  getName() {
    return this.name;
  }
}
const xj = new User("大军大叔");
console.log(xj);
构造函数用于传递对象的初始参数,但不是必须定义的,如果不设置系统会设置如下类型
- 子构造器中调用完
super后才可以使用this - 至于
super的概念会在后面讲到
constructor(...args) {
  super(...args);
}
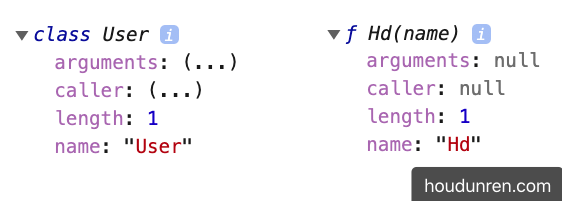
#原理分析
类其实是函数
class User {}
console.log(typeof User); //function
constructor 用于定义函数代码,下面是与普通函数的对比,结构是一致的
class User {
  constructor(name) {
    this.name = name;
  }
  show() {}
}
console.dir(User);
console.log(User == User.prototype.constructor); //true

//下面是对比的普通函数
function Hd(name) {
  this.name = name;
}
console.dir(Hd);
console.log(Hd == Hd.prototype.constructor); //true
在类中定义的方法也保存在函数原型中
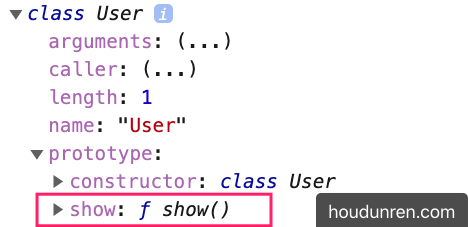
class User {
  constructor(name) {
    this.name = name;
  }
  show() {}
}
console.dir(User);
console.log(Object.getOwnPropertyNames(User.prototype)); //["constructor", "show"]
所以下面定义的类
class User {
  constructor(name) {
    this.name = name;
  }
  show() {
    console.log(this.name);
  }
}
与下面使用函数的定义是一致的
function User(name) {
  this.name = name;
}
Hd.prototype.show = function () {
  console.log(this.name);
};
#属性定义
在 class 中定义的属性为每个new 出的对象独立创建,下面定义了 site 与 name 两个对象属性
class User {
  site = "后盾人";
  constructor(name) {
    this.name = name;
  }
  show() {
    console.log(this.site + ":" + this.name);
  }
}
let hd = new User("大军");
hd.show();
#函数差异
class 是使用函数声明类的语法糖,但也有些区别
class 中定义的方法不能枚举
class User {
  constructor(name) {
    this.name = name;
  }
  show() {
    console.log(this.name);
  }
}
let xj = new User("大军");
//不会枚举出show属性
for (const key in xj) {
  console.log(key);
}

function Hd(name) {
  this.name = name;
}
Hd.prototype.show = function () {
  console.log(this.name);
};
let obj = new Hd("后盾人");
for (const key in obj) {
  console.log(key);
}
#严格模式
class 默认使用strict 严格模式执行
class User {
  constructor(name) {
    this.name = name;
  }
  show() {
    function test() {
      //严格模式下输出 undefined
      console.log(this);
    }
    test();
  }
}
let xj = new User("大军");
xj.show();

function Hd(name) {
  this.name = name;
}
Hd.prototype.show = function () {
  function test() {
    //非严格模式输出 Window
    console.log(this);
  }
  test();
};
let obj = new Hd("后盾人");
obj.show();
#静态访问
#静态属性
静态属性即为类设置属性,而不是为生成的对象设置,下面是原理实现
function User() {}
User.site = "后盾人";
console.dir(User);

const hd = new User();
console.log(hd.site); //undefiend
console.log(User.site); //后盾人
在 class 中为属性添加 static 关键字即声明为静态属性
- 可以把为所有对象使用的值定义为静态属性
class Request {
  static HOST = "https://www.houdunren.com";

  query(api) {
    return Request.HOST + "/" + api;
  }
}
let request = new Request();
#静态方法
指通过类访问不能使用对象访问的方法,比如系统的Math.round()就是静态方法
- 一般来讲方法不需要对象属性参与计算就可以定义为静态方法
下面是静态方法实现原理
function User() {
  this.show = function () {
    return "this is a object function";
  };
}
User.show = function () {
  return "welcome to houdunren";
};
const xj = new User();
console.dir(xj.show()); //this is a object function
console.dir(User.show()); //welcome to houdunren
在 class 内声明的方法前使用 static 定义的方法即是静态方法
class User {
  constructor(name) {
    this.name = name;
  }
  static create(name) {
    return new User(name);
  }
}
const xj = User.create("大军大叔");
console.log(xj);
下面使用静态方法在课程类中的使用
const data = [
  { name: "js", price: 100 },
  { name: "mysql", price: 212 },
  { name: "vue.js", price: 98 },
];
class Lesson {
  constructor(data) {
    this.model = data;
  }
  get price() {
    return this.model.price;
  }
  get name() {
    return this.model.name;
  }
  //批量生成对象
  static createBatch(data) {
    return data.map((item) => new Lesson(item));
  }
  //最贵的课程
  static MaxPrice(collection) {
    return collection.sort((a, b) => b.price() - a.price())[0];
  }
}
const lessons = Lesson.createBatch(data);
console.log(lessons);
console.log(Lesson.MaxPrice(lessons).name);
#访问器
使用访问器可以对对象的属性进行访问控制,下面是使用访问器对私有属性进行管理。
#语法介绍
- 使用访问器可以管控属性,有效的防止属性随意修改
- 访问器就是在函数前加上
get/set修饰,操作属性时不需要加函数的扩号,直接用函数名
class User {
  constructor(name) {
    this.data = { name };
  }
  get name() {
    return this.data.name;
  }
  set name(value) {
    if (value.trim() == "") throw new Error("invalid params");
    this.data.name = value;
  }
}
let hd = new User("大军大叔");
hd.name = "后盾人";
console.log(hd.name);
#访问控制
设置对象的私有属性有多种方式,包括后面章节介绍的模块封装。
#public
public 指不受保护的属性,在类的内部与外部都可以访问到
class User {
  url = "houdunren.com";
  constructor(name) {
    this.name = name;
  }
}
let hd = new User("后盾人");
console.log(hd.name, hd.url);
#protected
protected 是受保护的属性修释,不允许外部直接操作,但可以继承后在类内部访问,有以下几种方式定义
#命名保护
将属性定义为以 _ 开始,来告诉使用者这是一个私有属性,请不要在外部使用。
- 外部修改私有属性时可以使用访问器
setter操作 - 但这只是提示,就像吸烟时烟盒上的吸烟有害健康,但还是可以抽的
class Article {
  _host = "https://houdunren.com";

  set host(url) {
    if (!/^https:\/\//i.test(url)) {
      throw new Error("网址错误");
    }
    this._host = url;
  }

  lists() {
    return `${this._host}/article`;
  }
}
let article = new Article();
console.log(article.lists()); //https://houdunren.com/article
article.host = "https://hdcms.com";
console.log(article.lists()); //https://hdcms.com/article
继承时是可以使用的
class Common {
  _host = "https://houdunren.com";
  set host(url) {
    if (!/^https:\/\//i.test(url)) {
      throw new Error("网址错误");
    }
    this._host = url;
  }
}
class Article extends Common {
  lists() {
    return `${this._host}/article`;
  }
}
let article = new Article();
console.log(article.lists()); //https://houdunren.com/article
article.host = "https://hdcms.com";
console.log(article.lists()); //https://hdcms.com/article
#Symbol
下面使用 Symbol定义私有访问属性,即在外部通过查看对象结构无法获取的属性
const protecteds = Symbol();
class Common {
  constructor() {
    this[protecteds] = {};
    this[protecteds].host = "https://houdunren.com";
  }
  set host(url) {
    if (!/^https?:/i.test(url)) {
      throw new Error("非常网址");
    }
    this[protecteds].host = url;
  }
  get host() {
    return this[protecteds].host;
  }
}
class User extends Common {
  constructor(name) {
    super();
    this[protecteds].name = name;
  }
  get name() {
    return this[protecteds].name;
  }
}
let hd = new User("后盾人");
hd.host = "https://www.hdcms.com";
// console.log(hd[Symbol()]);
console.log(hd.name);
#WeakMap
WeakMap 是一组键/值对的集,下面利用WeakMap类型特性定义私有属性
const _host = new WeakMap();
class Common {
  constructor() {
    _host.set(this, "https://houdunren.com");
  }
  set host(url) {
    if (!/^https:\/\//i.test(url)) {
      throw new Error("网址错误");
    }
    _host.set(this, url);
  }
}
class Article extends Common {
  constructor() {
    super();
  }
  lists() {
    return `${_host.get(this)}/article`;
  }
}
let article = new Article();
console.log(article.lists()); //https://houdunren.com/article
article.host = "https://hdcms.com";
console.log(article.lists()); //https://hdcms.com/article
也可以统一定义私有属性
const protecteds = new WeakMap();
class Common {
  constructor() {
    protecteds.set(this, {
      host: "https://houdunren.com",
      port: "80",
    });
  }
  set host(url) {
    if (!/^https:\/\//i.test(url)) {
      throw new Error("网址错误");
    }
    protecteds.set(this, { ...protecteds.get(this), host: url });
  }
}
class Article extends Common {
  constructor() {
    super();
  }
  lists() {
    return `${protecteds.get(this).host}/article`;
  }
}
let article = new Article();
console.log(article.lists()); //https://houdunren.com/article
article.host = "https://hdcms.com";
console.log(article.lists()); //https://hdcms.com/article
#private
private 指私有属性,只在当前类可以访问到,并且不允许继承使用
- 为属性或方法名前加
#为声明为私有属性 - 私有属性只能在声明的类中使用
下面声明私有属性 #host 与私有方法 check 用于检测用户名
class User {
  //private
  #host = "https://houdunren.com";
  constructor(name) {
    this.name = name;
    this.#check(name);
  }
  set host(url) {
    if (!/^https?:/i.test(url)) {
      throw new Error("非常网址");
    }
    this.#host = url;
  }
  get host() {
    return this.#host;
  }
  #check = () => {
    if (this.name.length <= 5) {
      throw new Error("用户名长度不能小于五位");
    }
    return true;
  };
}
let hd = new User("后盾人在线教程");
hd.host = "https://www.hdcms.com";
console.log(hd.host);
#属性保护
保护属性并使用访问器控制
const protecteds = Symbol("protected");
class User {
  constructor(name) {
    this[protecteds] = { name };
  }
  get name() {
    return this[protecteds].name;
  }
  set name(value) {
    if (value.trim() == "") throw new Error("invalid params");
    this[protecteds].name = value;
  }
}
let hd = new User("大军大叔");
hd.name = "后盾人";
console.log(hd.name);
console.log(Object.keys(hd));
#详解继承
#属性继承
属性继承的原型如下
function User(name) {
  this.name = name;
}
function Admin(name) {
  User.call(this, name);
}
let hd = new Admin("后盾人");
console.log(hd);
这就解释了为什么在子类构造函数中要先执行super
class User {
  constructor(name) {
    this.name = name;
  }
}
class Admin extends User {
  constructor(name) {
    super(name);
  }
}
let hd = new Admin("后盾人");
console.log(hd);
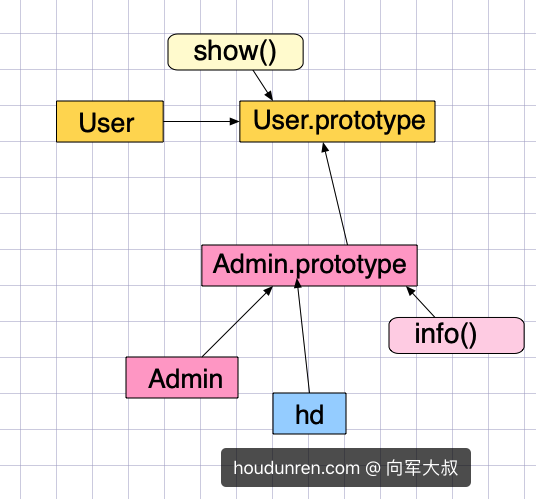
#继承原理
class 继承内部使用原型继承
class User {
  show() {
    console.log("user.show");
  }
}
class Admin extends User {
  info() {
    this.show();
  }
}
let hd = new Admin();
console.dir(hd);
#方法继承
原生的继承主要是操作原型链,实现起来比较麻烦,使用 class 就要简单的多了。
- 继承时必须在子类构造函数中调用 super() 执行父类构造函数
- super.show() 执行父类方法
下面是子类继承了父类的方法show
class Person {
  constructor(name) {
    this.name = name;
  }
  show() {
    return `后盾人会员: ${this.name}`;
  }
}
class User extends Person {
  constructor(name) {
    super(name);
  }
  run() {
    return super.show();
  }
}
const xj = new User("大军");
console.dir(xj.run());
可以使用 extends 继承表达式返回的类
function controller() {
  return class {
    show() {
      console.log("user.show");
    }
  };
}
class Admin extends controller() {
  info() {
    this.show();
  }
}
let hd = new Admin();
console.dir(hd);
#super
表示从当前原型中执行方法,
- super 一直指向当前对象
下面是使用 this 模拟super,会有以下问题
- 但
this指向当前对象,结果并不是admin的name值
let user = {
name: "user",
show() {
return this.name;
},
};
let admin = {
__proto__: user,
name: "admin",
show() {
return this.__proto__.show();
},
};
console.log(admin.show());
为了解决以上问题,需要调用父类方法时传递this
let user = {
name: "user",
show() {
return this.name;
},
};
let admin = {
__proto__: user,
name: "admin",
show() {
return this.__proto__.show.call(this);
},
};
console.log(admin.show());
上面看似结果正常,但如果是多层继承时,会出现新的问题
- 因为始终传递的是当前对象
this,造成从this原型循环调用
let common = {
show() {
console.log("common.init");
},
};
let user = {
__proto__: common,
name: "user",
show() {
return this.__proto__.show.call(this);
},
};
let admin = {
__proto__: user,
name: "admin",
get() {
return this.__proto__.show.call(this);
},
};
console.log(admin.get());
为了解决以上问题 js 提供了 super 关键字
- 使用
super调用时,在所有继承中this始终为调用对象 super是用来查找当前对象的原型,而不像上面使用this查找原型造成死循环- 也就是说把查询原型方法的事情交给了
super,this只是单纯的调用对象在各个继承中使用
let common = {
show() {
return this.name;
},
};
let user = {
__proto__: common,
name: "user",
show() {
return super.show(this);
},
};
let admin = {
__proto__: user,
name: "admin",
get() {
return super.show();
},
};
console.log(admin.get());
super 只能在类或对象的方法中使用,而不能在函数中使用,下面将产生错误
let user = {
name: "user",
show() {
return this.name;
},
};
let admin = {
__proto__: user,
name: "admin",
get: function () {
return super.show();
},
};
console.log(admin.get()); //Uncaught SyntaxError: 'super' keyword unexpected here
#constructor
super 指调父类引用,在构造函数constructor 中必须先调用super()
super()指调用父类的构造函数- 必须在
constructor函数里的this调用前执行super()
class User {
constructor(name) {
this.name = name;
}
show() {
console.log(this.name);
}
}
class Admin extends User {
constructor(name) {
super(name);
}
}
let hd = new Admin("后盾人");
hd.show();
constructor 中先调用 super 方法的原理如下
function Parent(name) {
this.name = name;
}
function User(...args) {
Parent.apply(this, args);
}
User.prototype = Object.create(User.prototype);
User.prototype.constructor = User;
const hd = new User("后盾人");
console.log(hd.name);
#父类方法
使用super 可以执行父类方法
- 不添加方法名是执调用父类构造函数
class User {
constructor(name) {
this.name = name;
}
getName() {
return this.name;
}
}
class Admin extends User {
constructor(name) {
super(name);
}
}
const hd = new Admin("后盾人");
console.log(hd.getName());
下面是通过父类方法获取课程总价
class Controller {
sum() {
return this.data.reduce((t, c) => t + c.price, 0);
}
}
class Lesson extends Controller {
constructor(lessons) {
super();
this.data = lessons;
}
info() {
return {
totalPrice: super.sum(),
data: this.data,
};
}
}
let data = [
{ name: "js", price: 100 },
{ name: "mysql", price: 212 },
{ name: "vue.js", price: 98 },
];
const hd = new Lesson(data);
console.log(hd.info());
#方法覆盖
子类存在父类同名方法时使用子类方法
class User {
constructor(name) {
this.name = name;
}
say() {
return this.name;
}
}
class Admin extends User {
constructor(name) {
super(name);
}
say() {
return "后盾人:" + super.say();
}
}
const xj = new Admin("大军");
console.log(xj.say());
下面是覆盖父类方法,只获取课程名称
class Controller {
say() {
return this.name;
}
total() {
return this.data.reduce((t, c) => t + c.price, 0);
}
getByKey(key) {
return this.data.filter((item) => item.name.includes(key));
}
}
class Lesson extends Controller {
constructor(lessons) {
super();
this.data = lessons;
}
getByKey(key) {
return super.getByKey(key).map((item) => item.name);
}
}
let data = [
{ name: "js", price: 100 },
{ name: "mysql", price: 212 },
{ name: "vue.js", price: 98 },
];
const hd = new Lesson(data);
console.log(hd.getByKey("js"));
#静态继承
静态的属性和方法也是可以被继承使用的,下面是原理分析
function User() {}
User.site = "后盾人";
User.url = function () {
return "houdunren.com";
};
function Admin() {}
Admin.__proto__ = User;
console.dir(Admin);
console.log(Admin.url());
下面使用 class 来演示静态继承
class User {
static site = "后盾人";
static host() {
return "houdunren.com";
}
}
class Admin extends User {}
console.dir(Admin);
#对象检测
#instanceof
使用 instanceof 用于检测,下面是在原型中的分析(已经在原型与继承中讲过)
function User() {}
function Admin() {}
Admin.prototype = Object.create(User.prototype);
let hd = new Admin();
console.log(hd instanceof Admin); //true
console.log(hd instanceof User); //true
console.log(hd.__proto__ == Admin.prototype);
console.log(hd.__proto__.__proto__ == User.prototype);
下面是递归检测原型的代码,帮助你分析 instanceof 的原理
function checkPrototype(obj, constructor) {
if (!obj.__proto__) return false;
if (obj.__proto__ == constructor.prototype) return true;
return checkPrototype(obj.__proto__, constructor);
}
class 内部实现就是基于原型,所以使用instanceof 判断和上面原型是一样的
class User {}
class Admin extends User {}
let hd = new Admin();
console.log(hd instanceof Admin);
console.log(hd instanceof User);
#isPrototypeOf
使用 isPrototypeOf 判断一个对象是否在另一个对象的原型链中,下面是原理分析
const a = {};
const b = {
__proto__: a,
};
const c = {
__proto__: b,
};
console.log(a.isPrototypeOf(b)); //true
console.log(a.isPrototypeOf(c)); //true
下面在使用 class 语法中使用
class User {}
class Admin extends User {}
let hd = new Admin();
console.log(Admin.prototype.isPrototypeOf(hd));
console.log(User.prototype.isPrototypeOf(hd));
#继承内置类
使用原型扩展内置类
function Arr(...args) {
args.forEach((item) => this.push(item));
this.first = function () {
return this[0];
};
this.max = function () {
return this.data.sort((a, b) => b - a)[0];
};
}
let a = [1, 23];
Arr.prototype = Object.create(Array.prototype);
let arr = new Arr("后盾人", 2, 3);
console.log(arr.first());
使用 class扩展内置类
class NewArr extends Array {
constructor(...args) {
super(...args);
}
first() {
return this[0];
}
add(value) {
this.push(value);
}
remove(value) {
let pos = this.findIndex((curValue) => {
return curValue == value;
});
this.splice(pos, 1);
}
}
let hd = new NewArr(5, 3, 2, 1);
console.log(hd.length); //4
console.log(hd.first()); //5
hd.add("houdunren");
console.log(hd.join(",")); //5,3,2,1,houdunren
hd.remove("3");
console.log(hd.join(",")); //5,2,1,houdunren
#mixin
关于mixin 的使用在原型章节已经讨论过,在class 使用也是相同的原理
JS不能实现多继承,如果要使用多个类的方法时可以使用mixin混合模式来完成。
mixin类是一个包含许多供其它类使用的方法的类mixin类不用来继承做为其它类的父类
其他语言也有类似的操作比如
php语言中可以使用trait完成类似操作
const Tool = {
max(key) {
return this.data.sort((a, b) => b[key] - a[key])[0];
},
};
class Lesson {
constructor(lessons) {
this.lessons = lessons;
}
get data() {
return this.lessons;
}
}
Object.assign(Lesson.prototype, Tool);
const data = [
{ name: "js", price: 100 },
{ name: "mysql", price: 212 },
{ name: "vue.js", price: 98 },
];
let hd = new Lesson(data);
console.log(hd.max("price"));
#实例操作
<style>
* {
padding: 0;
margin: 0;
box-sizing: content-box;
}
body {
padding: 30px;
}
.slide {
width: 300px;
display: flex;
flex-direction: column;
/* box-shadow: 0px 0px 10px rgba(0, 0, 0, 0.3); */
}
.slide dt {
height: 30px;
background: #34495e;
color: white;
display: flex;
align-items: center;
padding-left: 10px;
cursor: pointer;
}
.slide dt:first-of-type {
border-top-left-radius: 10px;
border-top-right-radius: 10px;
}
.slide dd {
height: 100px;
background: #f1c40f;
overflow: hidden;
}
.slide dd div {
padding: 10px;
}
.slide dd:last-of-type {
border-bottom-left-radius: 10px;
border-bottom-right-radius: 10px;
}
</style>
<body>
<div class="slide s1">
<dt>后盾人</dt>
<dd>
<div>houdunren.com</div>
</dd>
<dt>后盾人</dt>
<dd>
<div>hdcms.com</div>
</dd>
<dt>后盾人</dt>
<dd>
<div>hdcms.com</div>
</dd>
</div>
</body>
<script>
class Animation {
constructor(el) {
this.el = el;
this.timeout = 5;
this.isShow = true;
this.defaultHeight = this.height;
}
hide(callback) {
this.isShow = false;
let id = setInterval(() => {
if (this.height <= 0) {
clearInterval(id);
callback && callback();
return;
}
this.height = this.height - 1;
}, this.timeout);
}
show(callback) {
this.isShow = false;
let id = setInterval(() => {
if (this.height >= this.defaultHeight) {
clearInterval(id);
callback && callback();
return;
}
this.height = this.height + 1;
}, this.timeout);
}
get height() {
return window.getComputedStyle(this.el).height.slice(0, -2) * 1;
}
set height(height) {
this.el.style.height = height + "px";
}
}
class Slide {
constructor(el) {
this.el = document.querySelector(el);
this.links = this.el.querySelectorAll("dt");
this.panels = [...this.el.querySelectorAll("dd")].map(
item => new Panel(item)
);
this.bind();
}
bind() {
this.links.forEach((item, i) => {
item.addEventListener("click", () => {
this.action(i);
});
});
}
action(i) {
Panel.hideAll(Panel.filter(this.panels, i), () => {
this.panels[i].show();
});
}
}
class Panel extends Animation {
static num = 0;
static hideAll(items, callback) {
if (Panel.num > 0) return;
items.forEach(item => {
Panel.num++;
item.hide(() => {
Panel.num--;
});
});
callback && callback();
}
static filter(items, i) {
return items.filter((item, index) => index != i);
}
}
let hd = new Slide(".s1");
</script>